

Understanding how to inspect your brake rotors is a more straightforward process than many realize. The inspection primarily involves a series of visual checks for anomalies like cracks and grooves, followed by precise measurements to ensure they remain within established safety specifications. Mastering this procedure not only offers potential cost savings but is fundamental to ensuring your vehicle's braking system operates safely and effectively.
Why Brake Rotor Checks Are Essential for Your Safety
Your vehicle's brake rotors are the large metal discs located directly behind the wheels. When you depress the brake pedal, the brake pads apply pressure to these rotors, generating the friction required to decelerate your vehicle. This action produces immense heat and force, causing the rotors to wear down as a natural consequence of operation.
While brake pads often receive more attention, the rotors perform the critical function of converting kinetic energy into thermal energy. A smooth, flat rotor surface is indispensable for achieving optimal stopping power, particularly in emergency braking situations or on wet road surfaces.
The Impact of Wear and Tear
Each time you apply the brakes, whether in stop-and-go urban traffic or during highway driving, a minute amount of material is worn from the rotors. This is not indicative of poor driving habits but is a basic principle of physics. Over time, this cumulative wear manifests in several common issues:
- Vibrations: A pulsing sensation in the brake pedal often indicates that the rotors have warped.
- Noise: A grinding or squealing sound typically points to grooves scored into the rotor’s surface.
- Reduced Performance: Thin or damaged rotors are less effective at managing heat, which can increase the distance required to stop.
If you are experiencing any of these symptoms, you can learn more about the common signs you need new brakes in our related guide.
Neglecting these warning signs can lead to serious safety implications. According to the National Highway Traffic Safety Administration (NHTSA), brake-related issues are a contributing factor in thousands of vehicular accidents annually in the U.S. A warped rotor, for example, can extend a vehicle's stopping distance from 60 mph by as much as 20-30 feet.
A regular brake rotor inspection is not merely a preventative maintenance task to avoid costly repairs. It is one of the most critical actions you can take to ensure the safety of yourself, your passengers, and other road users.
To assist in diagnosing brake issues, we have compiled a quick reference guide. This tool helps correlate observable symptoms with their likely underlying causes.
Brake Rotor Wear Quick Reference Guide
This table provides a quick summary of the common symptoms of failing brake rotors and what they typically indicate, helping you diagnose potential issues at a glance.
| Symptom You Notice | What It Usually Means | Level of Urgency |
|---|---|---|
| Pulsing or vibrating brake pedal | The rotor is likely warped or has uneven wear. | Medium – Plan for an inspection soon. |
| Grinding or scraping sounds | Brake pads are worn down, and metal is grinding on the rotor. | High – Stop driving and inspect immediately. |
| High-pitched squealing | Could be wear indicators on brake pads or glazed rotors. | Medium – Inspect to determine the cause. |
| Visible grooves or deep scoring | Debris or worn pads have damaged the rotor surface. | High – Requires immediate professional assessment. |
Recognizing these signs is the first step. However, if any uncertainty exists, seeking a professional evaluation is always the most prudent course of action. Your safety is the paramount concern.
Gathering the Right Tools for the Job
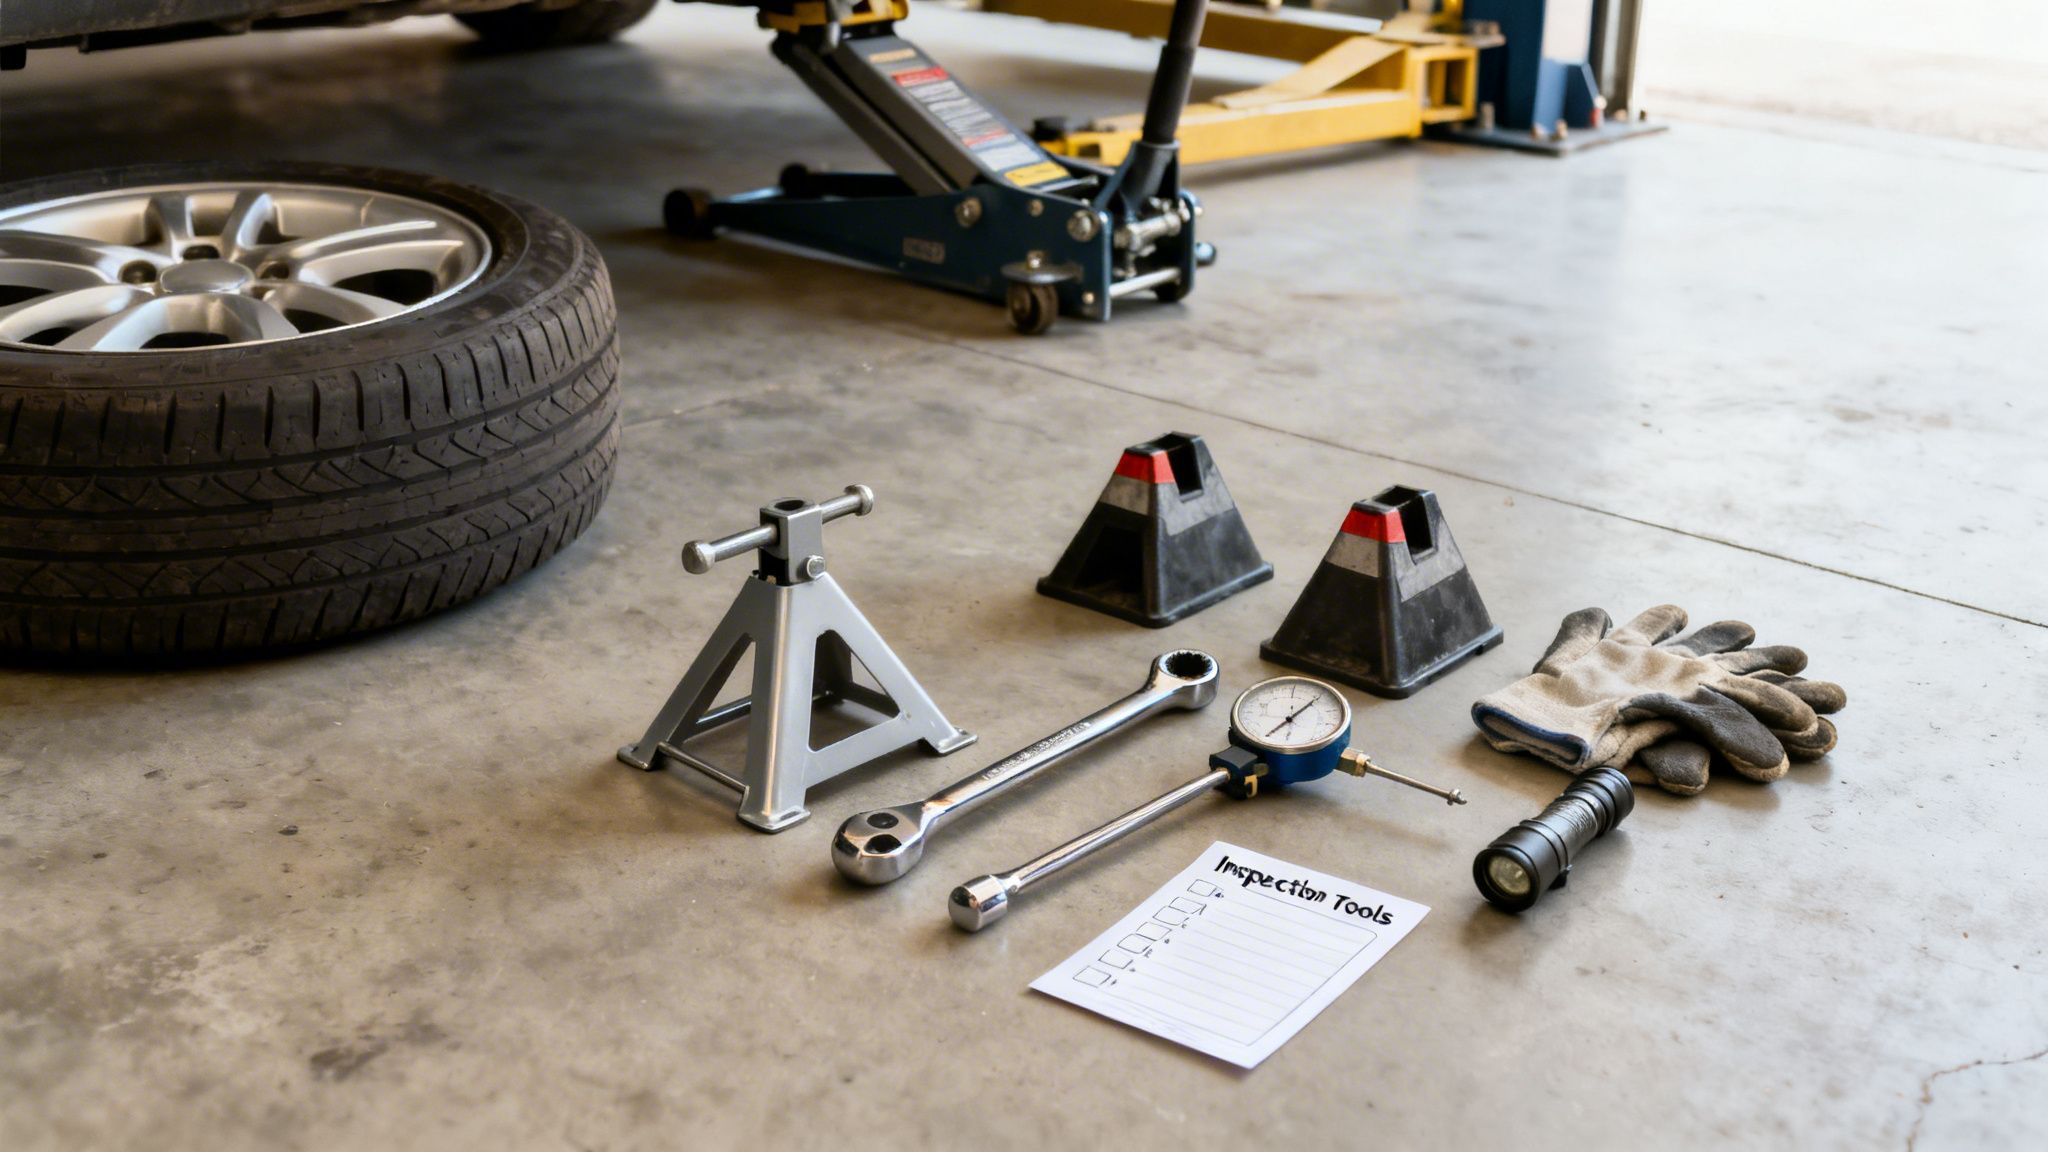
Before proceeding with the inspection, it is imperative to assemble the appropriate equipment. A proper brake inspection is an exercise in safety and precision, necessitating that you have the correct tools prepared in advance.
First, consider your workspace. It is absolutely mandatory to work on a hard, level surface, such as a concrete garage floor or a flat driveway. Attempting to lift a vehicle on an unstable or sloped surface like grass or dirt introduces significant risk.
Safety First: Your Lifting Equipment
Lifting a multi-ton vehicle from the ground is a serious undertaking where no shortcuts should be taken. Your personal safety is entirely dependent on using the correct equipment properly.
- Hydraulic Floor Jack: The scissor jack included with your vehicle is designed for emergency use only. A high-quality hydraulic floor jack provides superior stability and makes the lifting process significantly easier. Ensure its weight rating is sufficient for your vehicle.
- Jack Stands: These are the most critical safety devices you will use. After lifting the vehicle, its weight must be supported by at least two robust jack stands. A jack is a lifting device, not a holding device.
- Wheel Chocks: These simple but effective wedges serve as a crucial failsafe. Before lifting, place chocks securely behind the wheels remaining on the ground to eliminate any possibility of the vehicle rolling.
After chocking the wheels, break the lug nuts loose (do not remove them). Using your vehicle's manufacturer-specified jacking point, raise the vehicle until the tire is clear of the ground. Immediately position a jack stand under a solid point on the frame and carefully lower the vehicle's weight onto it.
Safety is the absolute priority. A significant percentage of injuries during DIY automotive repairs—estimated at over 75%—are associated with improper lifting techniques. Never position yourself under a vehicle that is supported solely by a jack. Always use jack stands.
The Tools for Inspection and Measurement
With the vehicle securely supported and the wheel removed, you can gather the tools for the inspection itself. This phase transitions from basic mechanical work to collecting the data that will determine the true condition of your rotors.
Here is a checklist of essential inspection tools:
- Lug Wrench or Breaker Bar: For removing the lug nuts and wheel.
- Wire Brush: Crucial for removing rust and caked-on brake dust from the rotor and hub. An accurate measurement is impossible without a clean surface.
- Brake Cleaner Spray: This solvent dissolves grease, grime, and fine dust, providing an unobstructed view of the rotor's surface.
- Flashlight or Headlamp: Adequate lighting is essential for identifying hairline cracks or subtle signs of overheating.
- Brake Rotor Micrometer: This is a specialized, professional-grade tool. Standard calipers cannot provide an accurate reading because they cannot get past the "lip" that forms on the outer edge of a worn rotor. A micrometer is the only tool that can measure the true thickness of the wear surface.
Possessing these specific tools, particularly the micrometer, elevates the procedure from a cursory glance to a genuine, safety-oriented inspection. Now that your workspace is secure and your tools are ready, you can proceed to the visual examination.
Getting a Good Look at Your Rotors
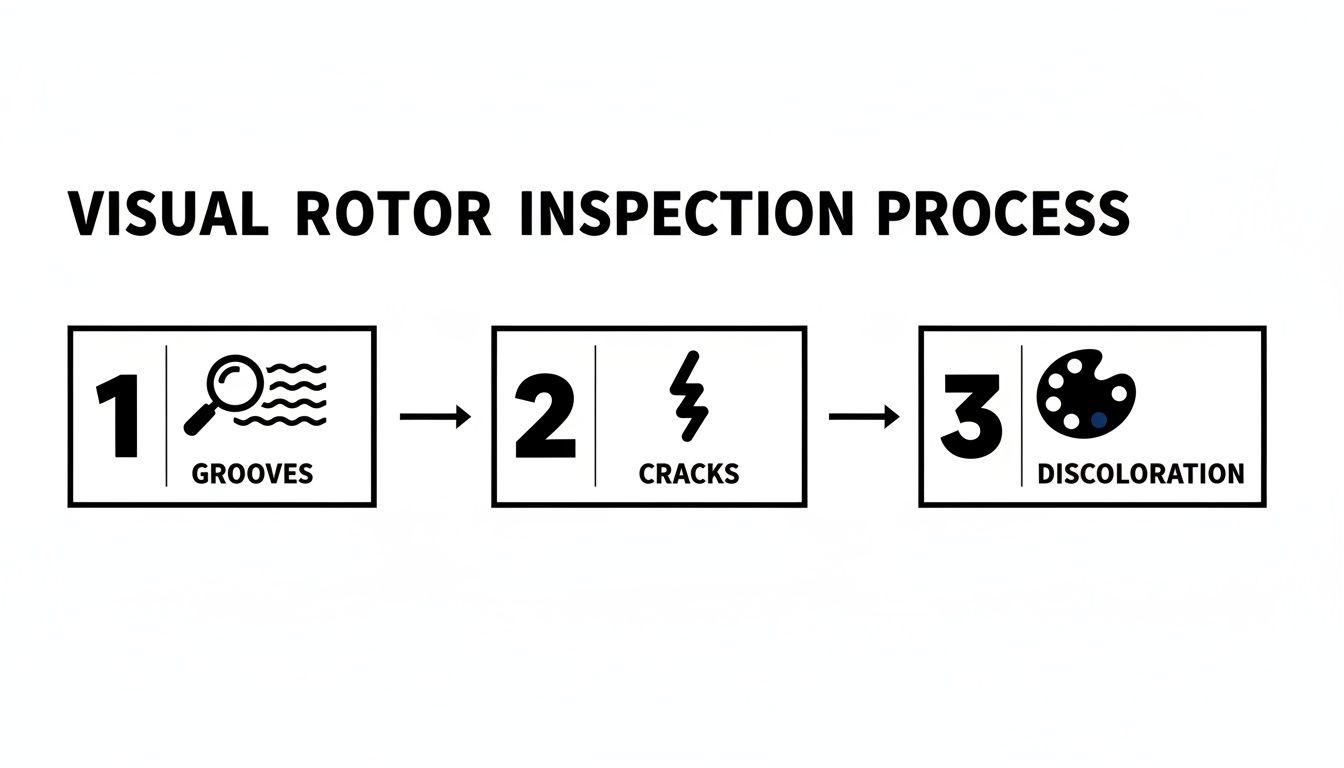
With the wheel removed, you now have an unobstructed view of the brake rotor. This is the starting point of the diagnostic process. This initial stage does not require specialized equipment—only your eyes, good illumination, and a clear understanding of what constitutes a problem.
The primary focus is the rotor's surface. Your objective is to identify any irregularities.
Spotting Grooves, Cracks, and Other Red Flags
Examine the surface for deep grooves, a condition known as scoring. This is a significant issue. If you can catch your fingernail in a groove, it indicates that the brake pads are not making full, uniform contact with the rotor, which severely compromises braking efficiency. This is often caused by brake pads that have worn down to their metal backing plate.
Next, meticulously inspect the entire rotor surface for heat stress cracks. These are tiny fractures that often radiate from the center. While some extremely fine surface crazing can be normal, any crack that is physically palpable is a critical safety hazard.
A brake rotor is engineered to withstand immense forces, but the presence of cracks compromises its structural integrity. If a crack is found, the rotor is no longer safe for use and must be replaced without exception.
Checking for Overheating and Rust
Observe the rotor's color. The presence of blue or dark purple blotches is a definitive sign of overheating. When a rotor reaches such high temperatures, the metallurgical properties of the iron can change, making it brittle and more susceptible to warping or cracking under load.
Rust is another factor to evaluate. A thin layer of surface rust is normal, particularly if the vehicle has been parked in a humid environment. This rust is typically wiped away during the first few brake applications.
However, heavy, flaking rust that causes pitting on the surface is a serious concern. Deep corrosion weakens the rotor's structure and creates an uneven surface for the pads. This is a primary cause of diminished brake performance. Despite modern braking systems reducing rotor overload by 35%, an estimated 1 in 5 U.S. vehicles fail inspections due to visible defects like severe corrosion or cracks.
- Pro Tip: Using coated rotors can extend their service life by 50-100%, especially in climates with high humidity or exposure to road salt. You can explore more data on automotive brake rotor technology trends to learn about advancements in this area.
Feeling for the Wear Lip
Perform one final tactile check. Run your finger over the outermost edge of the rotor's surface. You will likely feel a small ridge. This is the wear lip, which forms because the brake pads do not make contact with this part of the rotor.
The height of this lip corresponds to the amount of material worn away from the rotor's main surface. A prominent lip is a clear indicator that the rotor is approaching its service limit and requires measurement to verify if it remains within its safe thickness specification.
How to Measure Rotor Thickness and Runout
Visual inspection is an essential first step, but it does not provide a complete assessment of a brake rotor's condition. To definitively determine if your rotors are safe, you must use specialized tools to obtain precise measurements. This process provides the quantitative data needed for an informed decision.
Measuring Rotor Thickness
With the wheel removed and the rotor completely cool to the touch, the first measurement is its thickness. Do not use a standard set of calipers for this task. The wear lip on the outer edge of a used rotor will prevent an accurate reading, making the rotor seem thicker than it is. You must use a brake rotor micrometer, which is designed with deep jaws to bypass this lip and measure the actual pad contact surface.
The visual issues you may have already identified—such as grooves, cracks, or discoloration from heat—are often precursors to a rotor failing a measurement test.
The visual check and the physical measurement should be viewed as two parts of a single, comprehensive inspection. The first identifies potential issues, and the second confirms them with empirical data.
Finding the "Min TH" Spec
A measurement is only useful when compared against a standard. You must identify the rotor's minimum thickness, also known as the "discard thickness." This critical safety specification is almost always stamped directly onto the rotor's hub or edge, typically abbreviated as "MIN TH". For example, a rotor might have a new thickness of 28mm and a MIN TH of 26mm.
This specification is not a guideline; it is an absolute safety limit. A rotor that is worn below its minimum thickness cannot dissipate heat effectively, leading to a significant reduction in braking performance and a dramatically increased risk of brake failure.
Take measurements at several points around the rotor's circumference. Significant variations in thickness indicate uneven wear, which is a problem in itself. Another warning sign is a prominent wear lip; if it exceeds 1/16 inch, the wear is considered severe. Studies indicate that operating a vehicle with rotors below the minimum thickness can increase the 60-0 mph stopping distance by up to 12 feet. You can read more about the safety data and market trends for automotive brake rotors to understand the importance of this specification.
Checking for Runout (Warping)
If you have ever felt a pulsing or shuddering sensation through the brake pedal during deceleration, you have likely experienced the effects of runout. This is the technical term for the lateral deviation, or wobble, of a rotor as it rotates. To measure runout, you will need a dial indicator equipped with a magnetic base.
Follow this procedure for setup:
- Attach the magnetic base securely to a stationary part of the suspension, such as the steering knuckle.
- Position the indicator's plunger against the rotor's face, approximately one inch from the outer edge.
- Gently pre-load the plunger by pushing it slightly against the rotor, then rotate the dial's face to align the needle with "0".
Now, slowly and smoothly rotate the rotor by hand for one full revolution. Observe the dial. The total range of movement of the needle from its minimum to maximum reading is the runout measurement.
The acceptable tolerance for runout is extremely small, typically less than 0.002 inches. Any measurement exceeding this is often perceptible to the driver. High runout does not always condemn the rotor; it can sometimes be caused by rust or debris between the rotor and the wheel hub. Thoroughly cleaning the mounting surfaces may resolve the issue. However, if runout remains excessive after cleaning, the rotor is warped and must be resurfaced or replaced.
Making the Call: Resurface or Replace Your Rotors
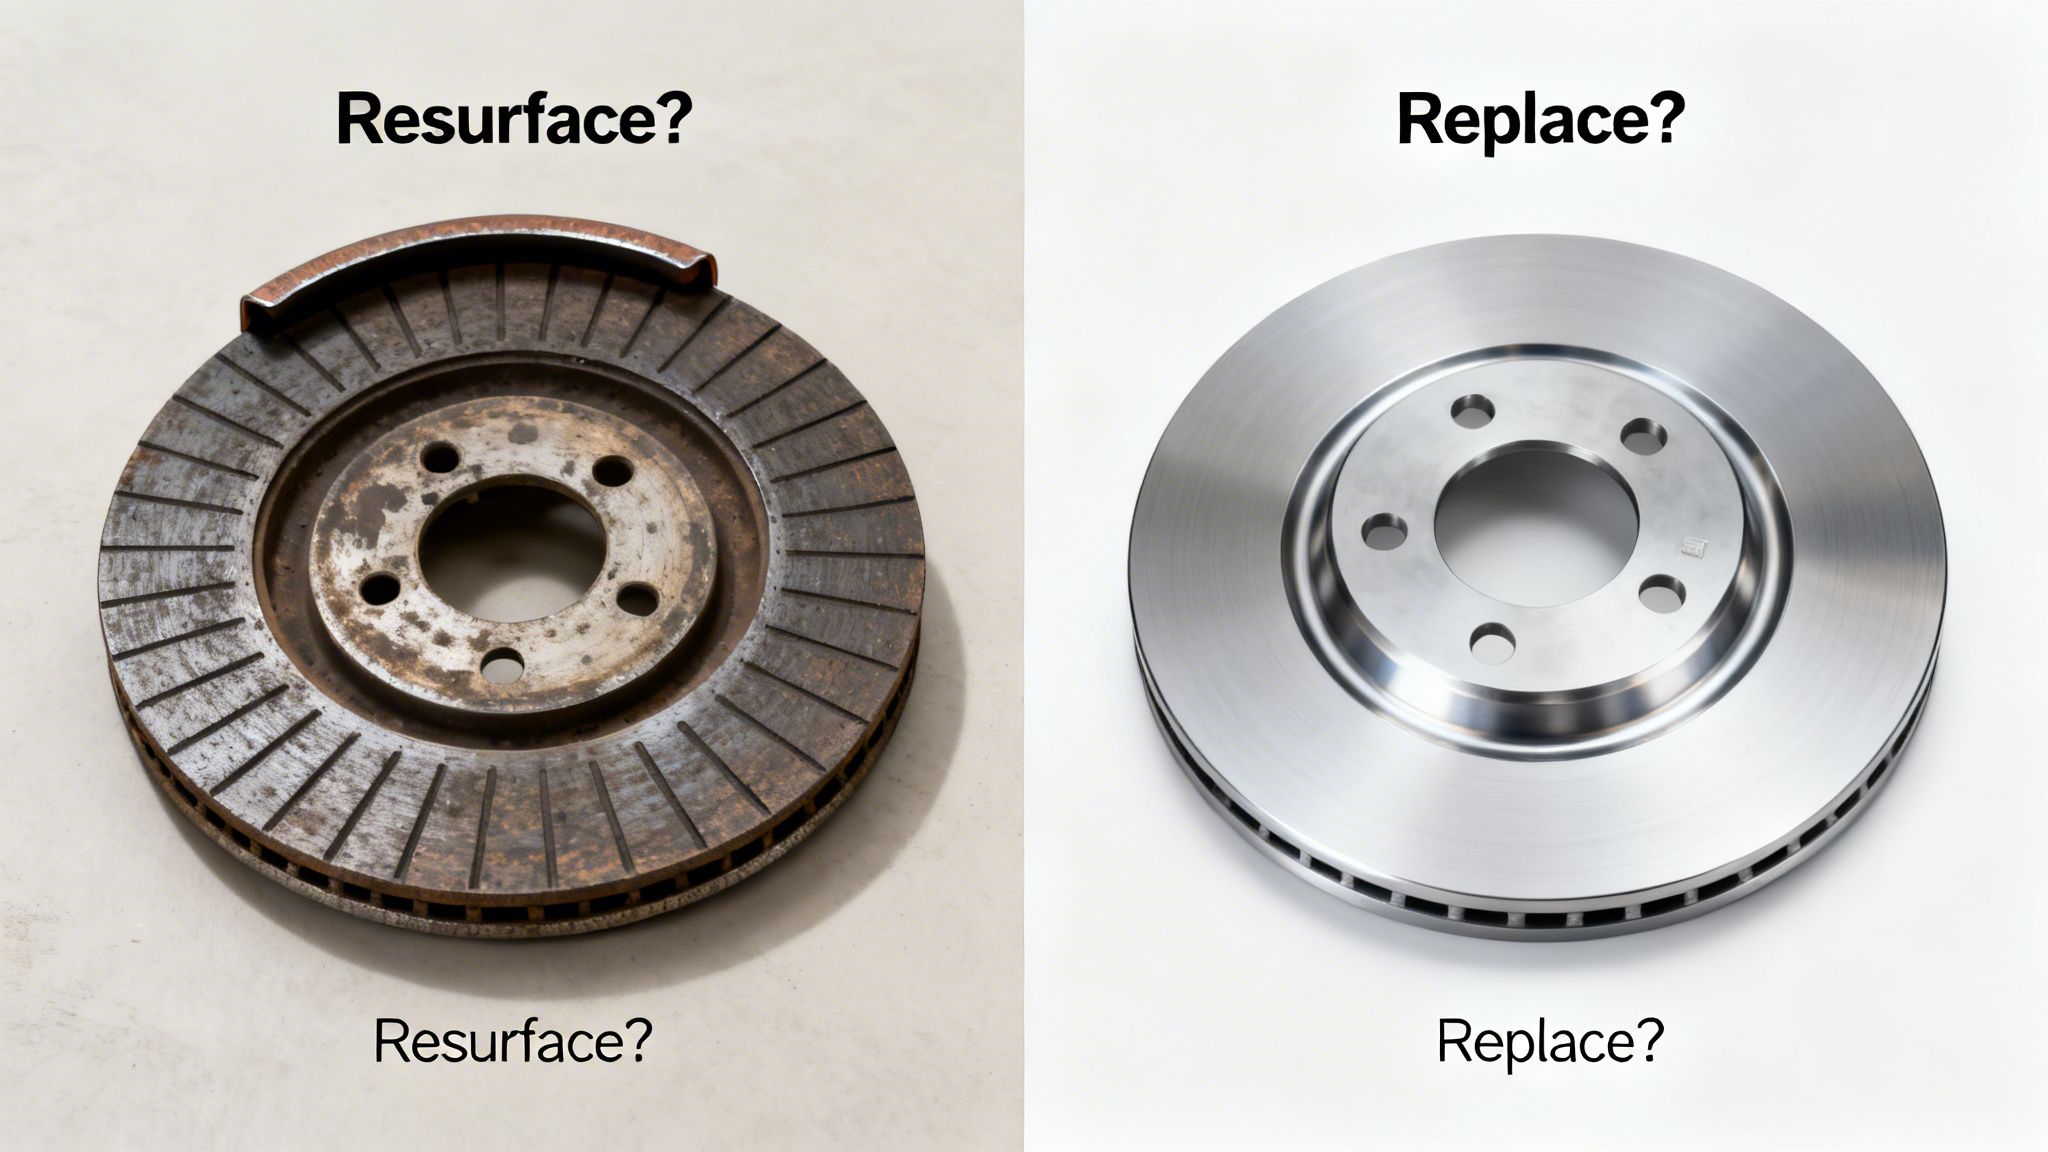
You have completed the inspection and have your observational notes and precise measurements. Now, you must make a critical decision: should the rotors be resurfaced, or is a full replacement necessary?
The correct course of action depends entirely on the rotor's physical condition and its measured thickness. Resurfacing (also called "machining" or "turning") is analogous to sanding a piece of wood. A thin layer of material is removed to restore a perfectly flat and smooth surface. However, just as with wood, there is a finite amount of material that can be removed before the part becomes too thin to be functional.
When Resurfacing Is a Good Option
Resurfacing can be a cost-effective solution, but only if the rotors meet specific criteria. They are viable candidates for machining if they satisfy all of the following conditions:
- The surface exhibits only light scoring, minor glazing, or slight warping that causes a faint pedal pulsation.
- There are absolutely no visible cracks, not even hairline fractures.
- The rotor's thickness is well above its specified minimum thickness. This is non-negotiable.
For instance, if a rotor's minimum thickness is stamped as 26 mm and it currently measures 27.5 mm, a technician has sufficient material to machine it safely while remaining within specification. Conversely, if it already measures 26.5 mm, there is insufficient material for resurfacing.
When You Must Replace
In many cases, particularly with the thinner, lightweight rotors used on modern vehicles, replacement is the only safe and appropriate action. Certain conditions are immediate disqualifiers for resurfacing.
If your inspection reveals any cracks, severe heat spots (indicated by dark blue or purple discoloration), or a thickness measurement at or below the minimum specification, the rotor is unserviceable. Replacement is the only safe option.
Attempting to salvage a compromised rotor is a dangerous gamble with your safety. Making the correct determination at this stage is a crucial aspect of any brake service. To better understand the full scope of this job, you can learn more about what a complete brake service includes on our blog.
To aid in your decision-making, we have developed the following matrix.
Resurface vs. Replace Decision Matrix
This table breaks down common rotor conditions and the recommended action, helping you quickly determine the best path forward for your vehicle's safety and performance.
| Rotor Condition | Recommended Action | Reasoning |
|---|---|---|
| Minor scoring, light rust | Resurface | These surface-level issues can be machined away, provided the rotor has enough thickness. |
| Slight warping (pedal pulsation) | Resurface | Machining restores a true, flat surface, eliminating the vibration. |
| Visible cracks (any size) | Replace | Cracks compromise the rotor's structural integrity and can lead to catastrophic failure. |
| At or below minimum thickness | Replace | The rotor lacks the mass to properly dissipate heat, making it unsafe. |
| Deep grooves or heavy scoring | Replace | Removing deep grooves would likely take the rotor below its minimum thickness. |
| Severe heat damage (blue/purple) | Replace | This indicates the metal's temper has been compromised, making it brittle and prone to cracking. |
This matrix simplifies your inspection findings into a clear, safety-first decision.
One Final Pro Tip: Always Work in Pairs
Whether you choose to resurface or replace your rotors, there is a cardinal rule that all competent mechanics follow: always service rotors in pairs on the same axle.
Never replace only a single rotor. A new rotor possesses entirely different thermal and frictional properties compared to a worn one. This imbalance can cause the vehicle to pull dangerously to one side during braking.
By replacing both front or both rear rotors simultaneously, you ensure balanced, predictable, and safe braking performance every time you press the pedal.
When to Partner with a Professional Mechanic
Acquiring the skill to inspect your own brake rotors is valuable for any vehicle owner. However, the true mark of a knowledgeable DIYer is recognizing the limits of their expertise and knowing when to entrust the job to a professional.
With braking systems, there is no margin for error. If your inspection reveals any of the serious issues detailed below, the appropriate next step is to contact a trusted automotive repair facility.
Red Flags That Mean "Stop Immediately"
Certain problems are too severe to be addressed in a home garage. These are non-negotiable issues that directly compromise your vehicle's ability to stop safely. If you encounter any of the following, seek an expert opinion immediately.
- Visible Cracks: Even a microscopic hairline crack constitutes a major structural failure. A cracked rotor can disintegrate under the immense pressure and heat of hard braking.
- Below Minimum Thickness: The "MIN TH" stamp on the rotor is an absolute safety limit, not a recommendation. A rotor that is too thin cannot adequately dissipate heat and is at high risk of warping or failing catastrophically.
- Serious Warping: If your dial indicator registers runout far beyond the typical 0.002-inch tolerance, and cleaning the hub surface does not rectify it, the rotor is likely too warped for a simple remedy.
- Deep Grooves or Pitting: When a groove is deep enough to catch a fingernail, or you observe deep pitting from corrosion, the surface is too damaged for brake pads to make effective contact, severely reducing stopping power.
Recognizing your limitations is a sign of wisdom, not failure. When dealing with your vehicle's brakes, the safest choice is always the correct one. A professional diagnosis provides a level of assurance that is invaluable.
The Value of an ASE-Certified Technician
Engaging a professional repair shop provides access to years of practical experience and advanced diagnostic equipment that surpasses a typical home setup. An ASE-certified technician can identify underlying issues that an untrained eye might miss.
For example, they can determine if a seized brake caliper is the root cause of uneven rotor wear, or if a malfunctioning ABS module is contributing to the problem. If you require expert assistance, our guide to professional brake repair in Plano, TX can help you find qualified help.
Ultimately, working with a professional ensures that the cause of the problem is rectified, not just the symptom. This is the most reliable way to guarantee your vehicle is safe for yourself and for everyone else on the road.
If you are uncertain about the results of your brake inspection, or if you prefer to have a trusted professional handle the service, the ASE-certified technicians at Express Lube & Car Care are here to assist you. We utilize advanced diagnostic tools to provide honest, clear assessments and restore your vehicle's safety. Visit our Plano shop for a comprehensive brake evaluation today.