

Corrosion on your car battery terminals—that crusty, white, or bluish-green buildup—is a primary cause of no-start situations. Understanding how to clean car battery terminals is a fundamental vehicle maintenance skill that ensures a reliable electrical connection and can prevent you from being stranded. This guide explains the science behind the problem and provides a step-by-step process for a lasting solution.
How to Clean Car Battery Terminals Safely Step by Step: Understanding the Science of Corrosion and Why It Matters
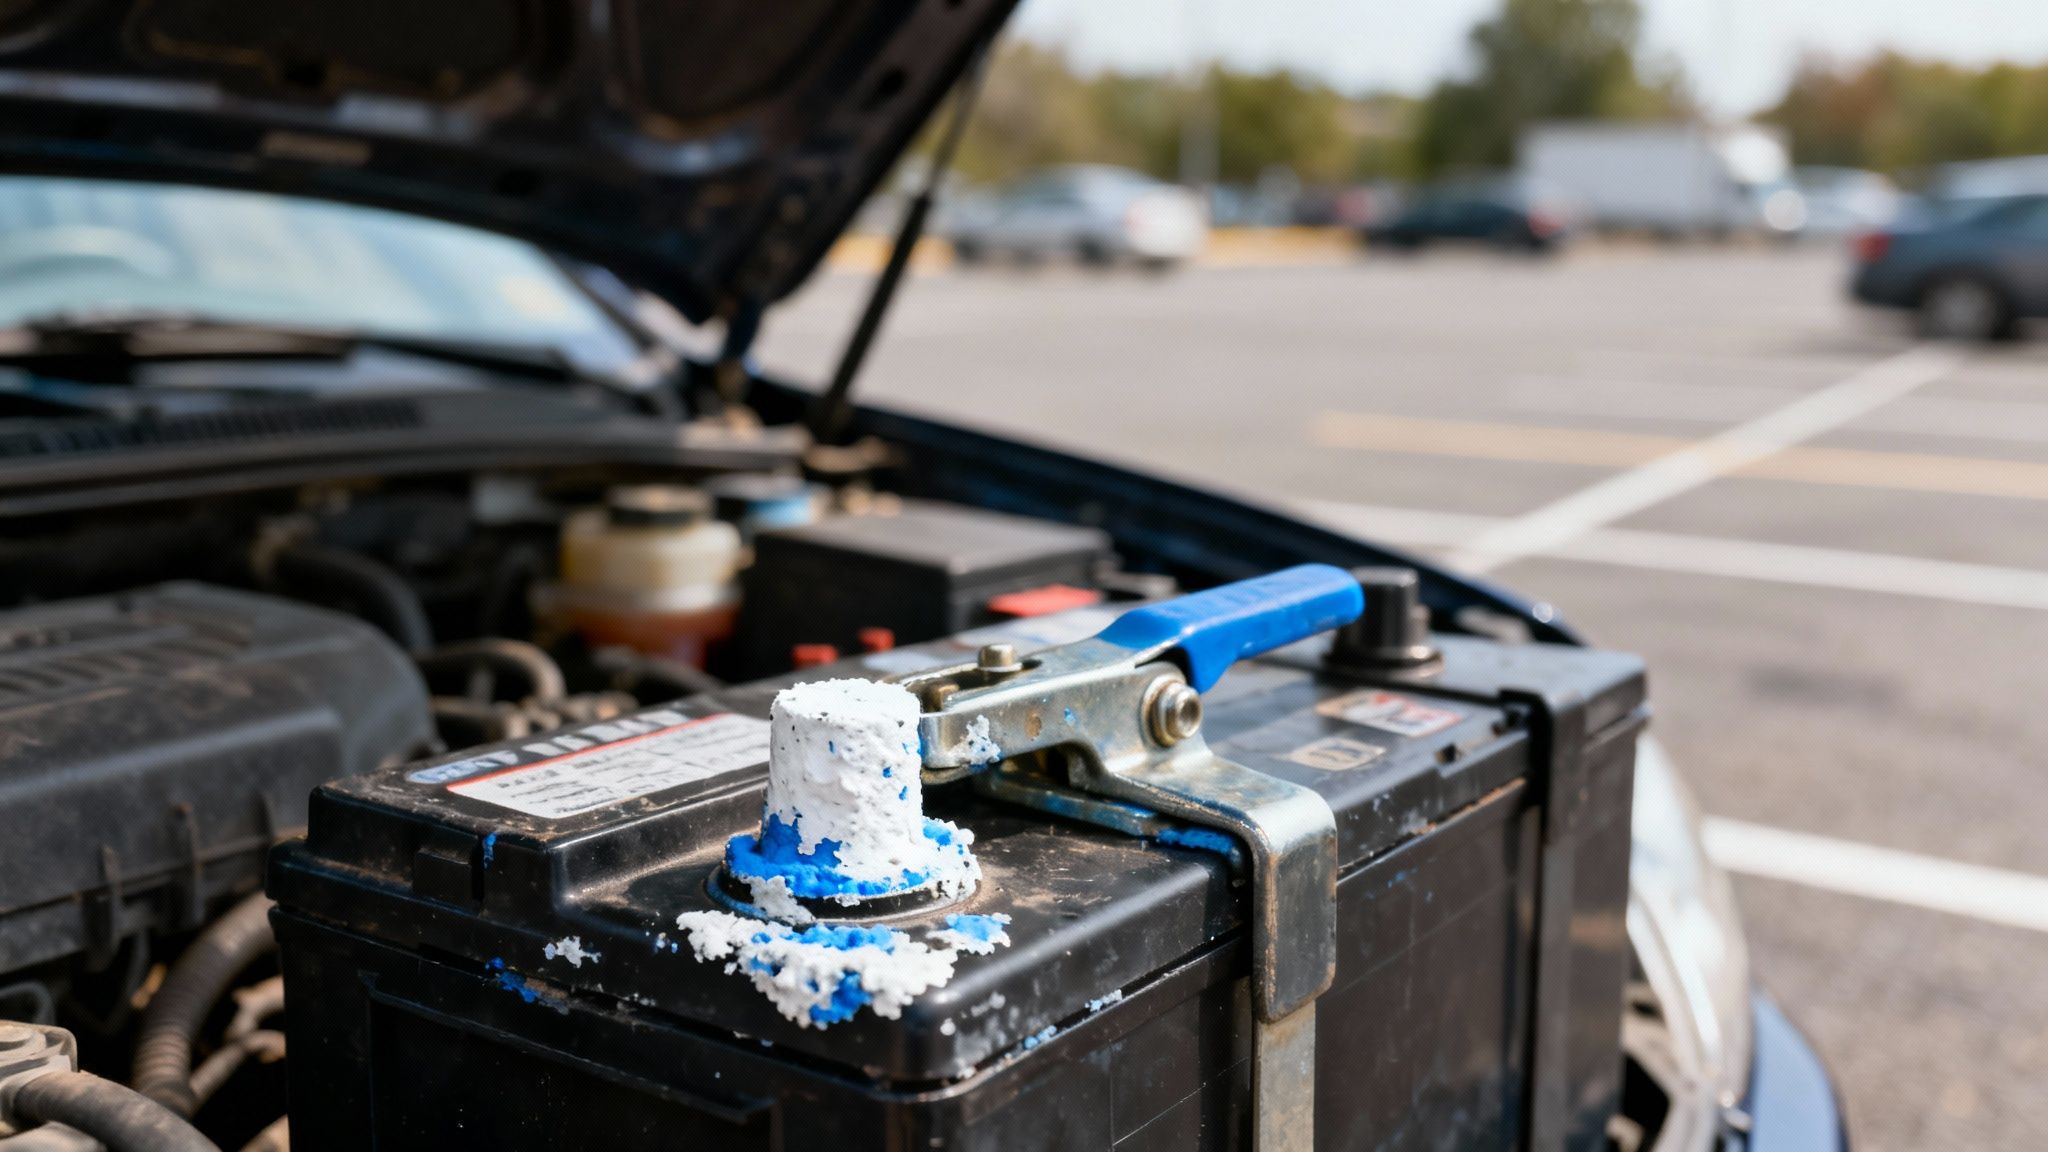
The powdery substance you see is typically lead sulfate, a crystalline formation that acts as an insulator. Hydrogen gas produced during battery operation escapes and reacts with metal components, leading to corrosion buildup. It forms when sulfuric acid vapor from within the battery vents and reacts with the lead terminals and the surrounding atmosphere. This chemical reaction creates a barrier that significantly increases electrical resistance, impeding the flow of current between the battery and the vehicle’s electrical system.
Battery acid is only part of the cause of battery terminal corrosion; hydrogen gas and other chemical reactions also contribute to car battery corrosion. Battery terminal corrosion is primarily made up of lead sulfate and is highly acidic. As batteries age, internal breakdown and escaping gases increase the risk of corrosion.
Even a thin layer of this corrosion can prevent the starter motor from drawing the high amperage it needs to turn over the engine. Corrosion, dirt, and grime on battery terminals can break the electrical connection, causing hard starts, flickering lights, and sluggish performance. Furthermore, this resistance hinders the alternator’s ability to efficiently recharge the battery, which can reduce its operational lifespan. Keeping battery terminals clean can extend battery life and prevent unexpected no-start situations.
The Impact of Neglected Terminals
A vehicle failing to start in a Plano parking lot due to corroded terminals is an avoidable scenario. The cause is often not a faulty battery but simply a poor electrical connection. National roadside assistance organizations report that battery-related issues account for 25–35% of all service calls, with a significant portion stemming from preventable corrosion.
This simple maintenance procedure is a highly effective form of preventative care. It addresses a common point of failure in a vehicle’s electrical system, ensuring consistent performance and helping to prevent future corrosion.
Properly maintaining your battery terminals is an integral part of your vehicle’s overall health. Regular maintenance and keeping battery terminals clean are essential to prevent future corrosion and ensure reliable vehicle operation. Ignoring this task can lead to unexpected breakdowns, premature battery failure, and unnecessary replacement costs. It’s a foundational component of the routine what maintenance your car needs to remain dependable.
Essential Tools and Safety Protocols
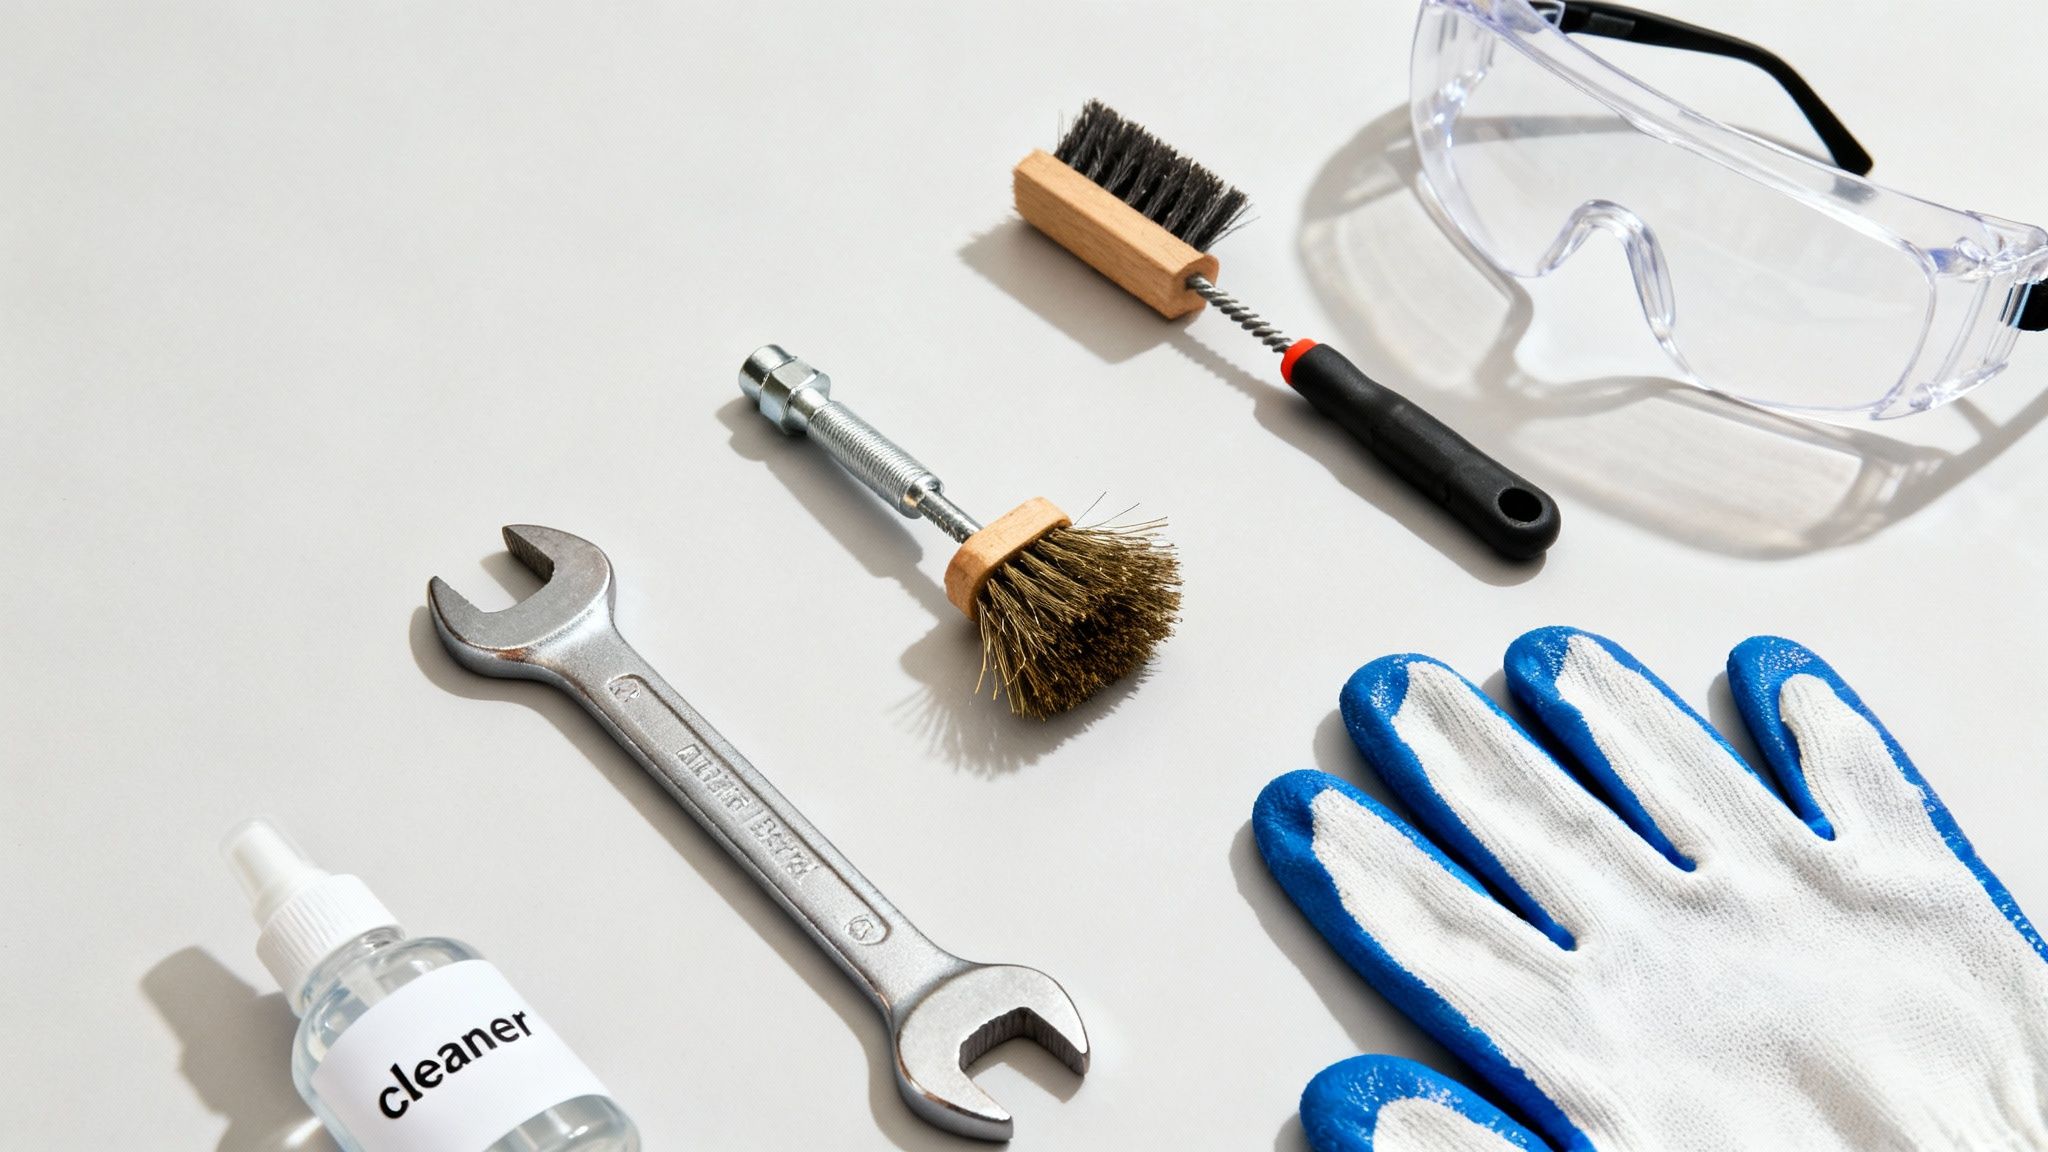
Before beginning any work, it is crucial to assemble the necessary tools and personal protective equipment (PPE). Basic tools such as a wrench with insulated handles and a wire brush are sufficient for the job. Always consult your owner’s manual to locate the battery and review any specific maintenance instructions for your vehicle. A methodical approach ensures both safety and efficiency, transforming this task into a straightforward, ten-minute procedure. Most of the required items are common in a home garage, including a socket wrench set and a dedicated battery terminal cleaning brush or wire brush.
Prioritizing Personal Safety
Working with a lead-acid battery involves potential exposure to sulfuric acid, a highly corrosive substance. Before you begin, always follow essential safety precautions to reduce risks such as sparks, short circuits, and chemical exposure. Protecting your skin and eyes is non-negotiable—wear safety glasses to shield your eyes from caustic materials. Cleaning car battery terminals safely requires neutralizing corrosive acid and avoiding dangerous electrical shorts. Your safety equipment must include:
Chemical-resistant gloves (nitrile or neoprene) to prevent skin contact.
Safety glasses or goggles to protect your eyes from accidental splashes.
With safety measures in place, you can prepare your cleaning agent.
Selecting an Effective Cleaning Solution
Several options are available for cleaning battery terminals, ranging from commercial formulas to common household items. The choice depends on the severity of the corrosion and the materials you have available. A diy solution using water and baking soda is especially effective for those looking to clean battery terminals at home.
Cleaning Agent | Chemical Principle | Cost | Safety & Efficacy |
|---|---|---|---|
Baking Soda & Water Paste | A mild base (sodium bicarbonate) that neutralizes the acidic corrosion (lead sulfate). | Low | Highly effective and safe. The effervescent reaction provides a visual confirmation of neutralization. To clean battery terminals, mix one tablespoon of baking soda with one cup of water to create a cleaning solution that neutralizes battery acid. Avoid scraping battery corrosion off dry, as this can cause harmful dust to become airborne. Using a baking soda paste is a safe and effective way to clean battery terminals and maintain a clean battery. |
Commercial Battery Cleaner | Formulated with neutralizing agents, often including a pH indicator that changes color to confirm neutralization. | Medium | Very efficient and fast-acting. Reduces mess and provides clear results. |
Carbonated Cola | Contains phosphoric acid, which can dissolve the corrosion. | Low | Moderately effective in an emergency, but leaves a sticky sugar residue that attracts dirt and can cause future issues. |
Plain Water & Brush | Mechanical removal without chemical neutralization. | Free | Suitable only for light dust; ineffective against established chemical corrosion. |
For most applications, a paste of baking soda and water is the recommended solution. It is inexpensive, readily available, and effectively neutralizes the acidic buildup, which is the root cause of the problem. After cleaning, have a clean, lint-free cloth or paper towels ready for thorough drying.
The objective is not just to clean the terminals but to restore optimal conductivity. This ensures the vehicle’s electrical system receives the stable voltage and amperage required for proper operation of all components.
A Step-by-Step Guide to Cleaning Battery Terminals
With your safety equipment on and tools prepared, you can begin the cleaning process. The sequence of operations is critical to prevent accidental short circuits.
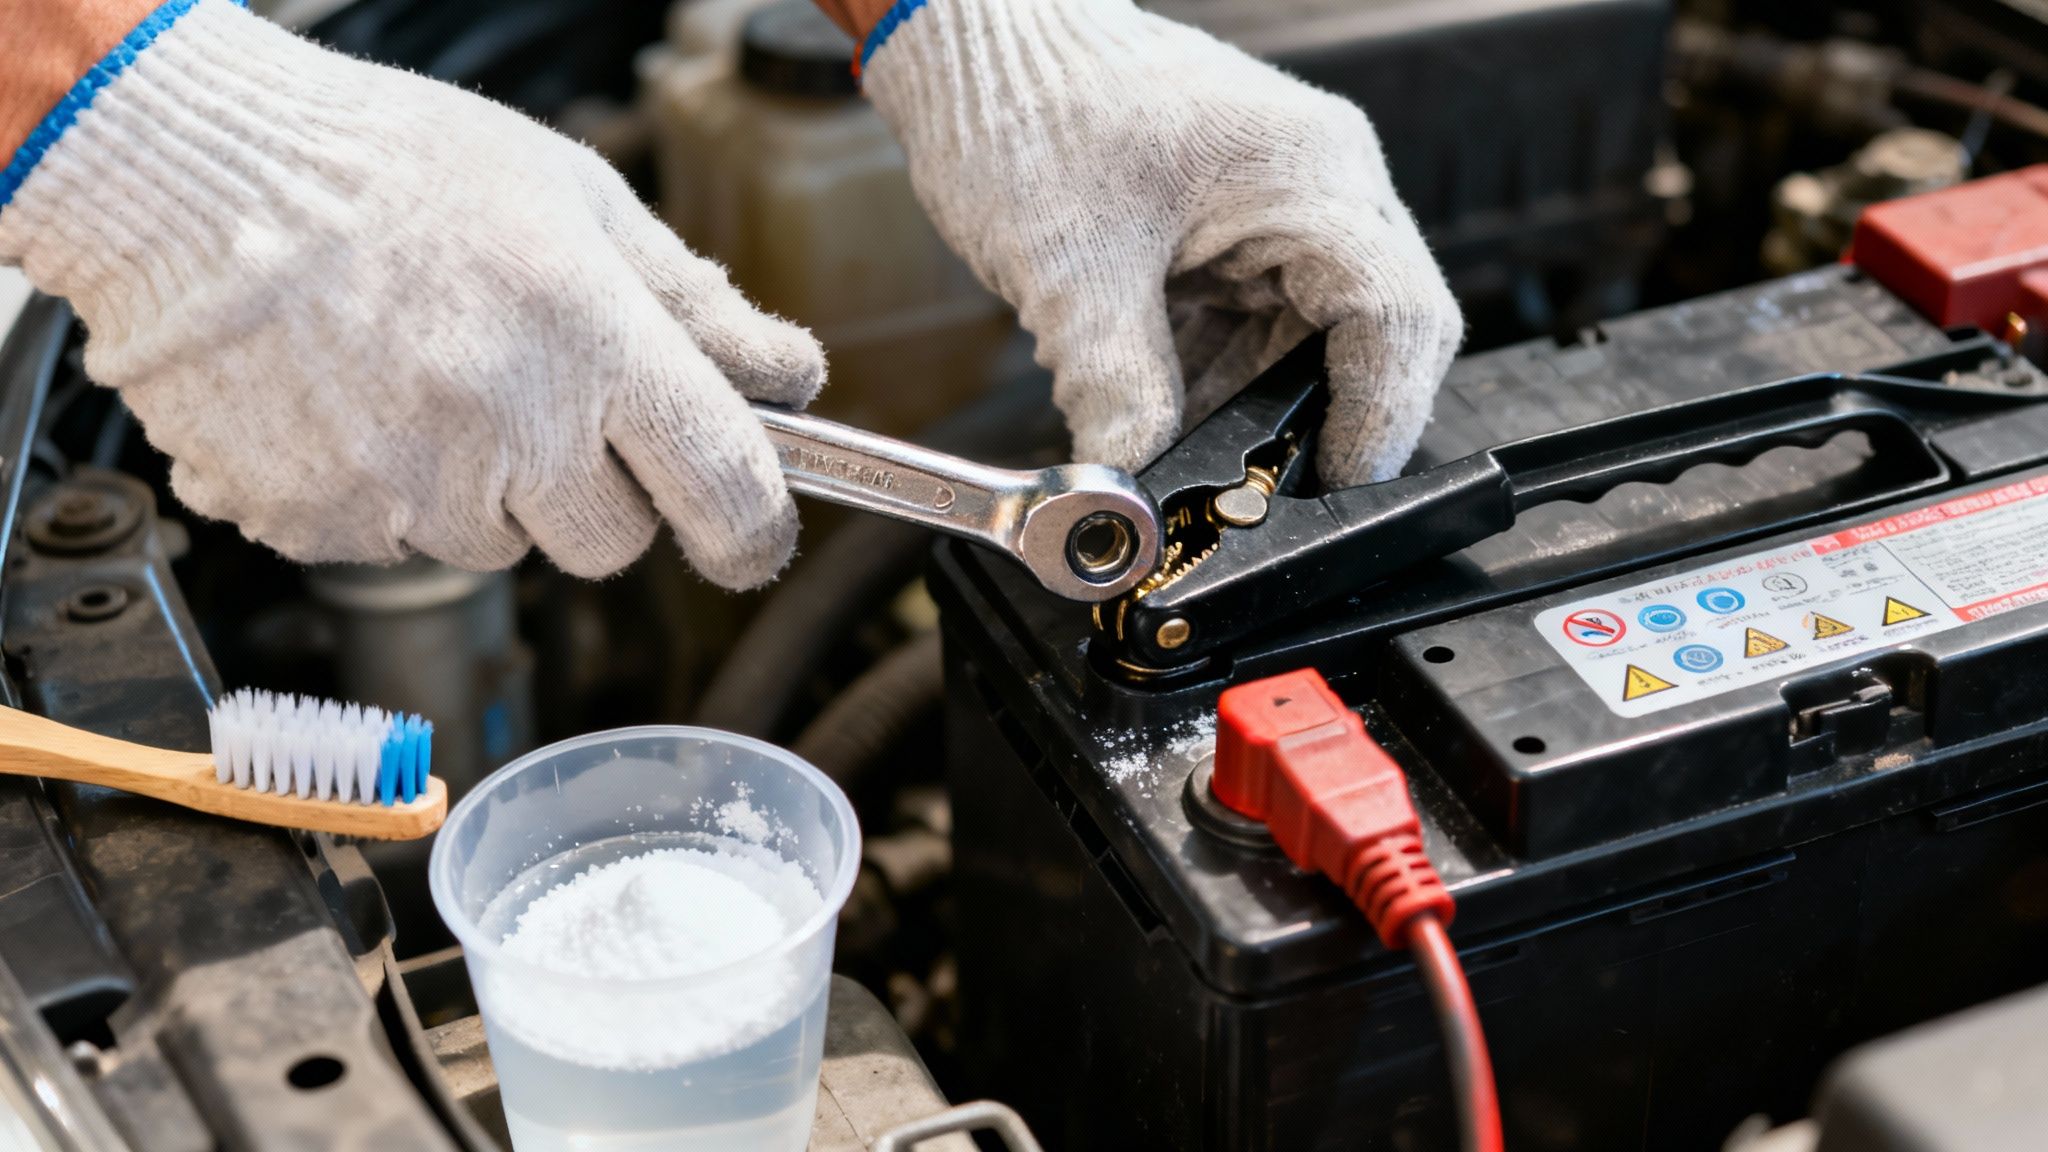
The fundamental safety rule is: Always disconnect the negative (black, “-“) terminal first. This step is essential to avoid an electrical short and should never be skipped.
Disconnecting the negative terminal cable isolates the battery from the vehicle’s chassis, which acts as the ground. This eliminates the risk of creating a spark if your metal wrench were to simultaneously touch the positive terminal and a metal part of the car. If your battery is too weak to start the car due to corrosion, you may need jumper cables to get going before cleaning.
After removing the negative cable and securing it away from the battery post, you may proceed to loosen and remove the positive (red, “+”) terminal cable. You now have safe access to the battery posts, cable connectors, and cable ends for cleaning. Be sure to clean the cable connectors and cable ends thoroughly—sometimes a bit of elbow grease is needed to remove stubborn buildup.
Once cleaning is complete, consider performing a battery test to check the overall health of your battery. Remember, regular maintenance of your battery terminals and connectors helps prevent future issues and ensures reliable vehicle performance.
Neutralizing and Removing Battery Corrosion
Apply your chosen cleaning agent—either a commercial spray or your baking soda paste—liberally to the battery posts and the interior surfaces of the terminal clamps. You will observe an immediate chemical reaction (fizzing) as the agent begins to neutralize the acidic corrosion. Allow the baking soda mixture to sit and fizz for 5 to 8 minutes to fully neutralize the acid and help remove corrosion. This step is crucial to protect electrical components from future damage.
Next, use a battery terminal brush or a wire brush to scrub all surfaces. For heavy corrosion, a wire brush may be necessary to effectively remove corrosion and expose the bare, shiny metal of the posts and the inner walls of the clamps. Removing all traces of corrosion is essential for maintaining battery health and ensuring reliable vehicle starting. An old toothbrush can be useful for cleaning hard-to-reach areas on the clamps.
A common oversight is cleaning only the visible tops of the battery posts. The primary electrical contact area is the circumference of the post where the clamp tightens. Therefore, thoroughly cleaning the inside of the clamp is equally important.
Rinsing and Drying for a Lasting Result
Once all corrosion has been scrubbed away, completely rinse the battery area with clean water to remove all baking soda and loose corrosion, taking care to prevent water from entering the battery’s vent caps. Use a damp cloth to wipe away any remaining residue from the terminals and cables.
Finally, dry the terminals completely with a clean cloth—ensure there is no moisture left on the battery posts, cable clamps, or surrounding area. Residual moisture encourages new corrosion on battery terminals and cables, even on clean terminals. The battery posts, cable clamps, and the surrounding area must be entirely dry before reassembly. A meticulous approach to cleaning, rinsing, and drying ensures the longevity of the repair and restores the integrity of the electrical connection.
Applying a Protective Barrier to Prevent Recurrence
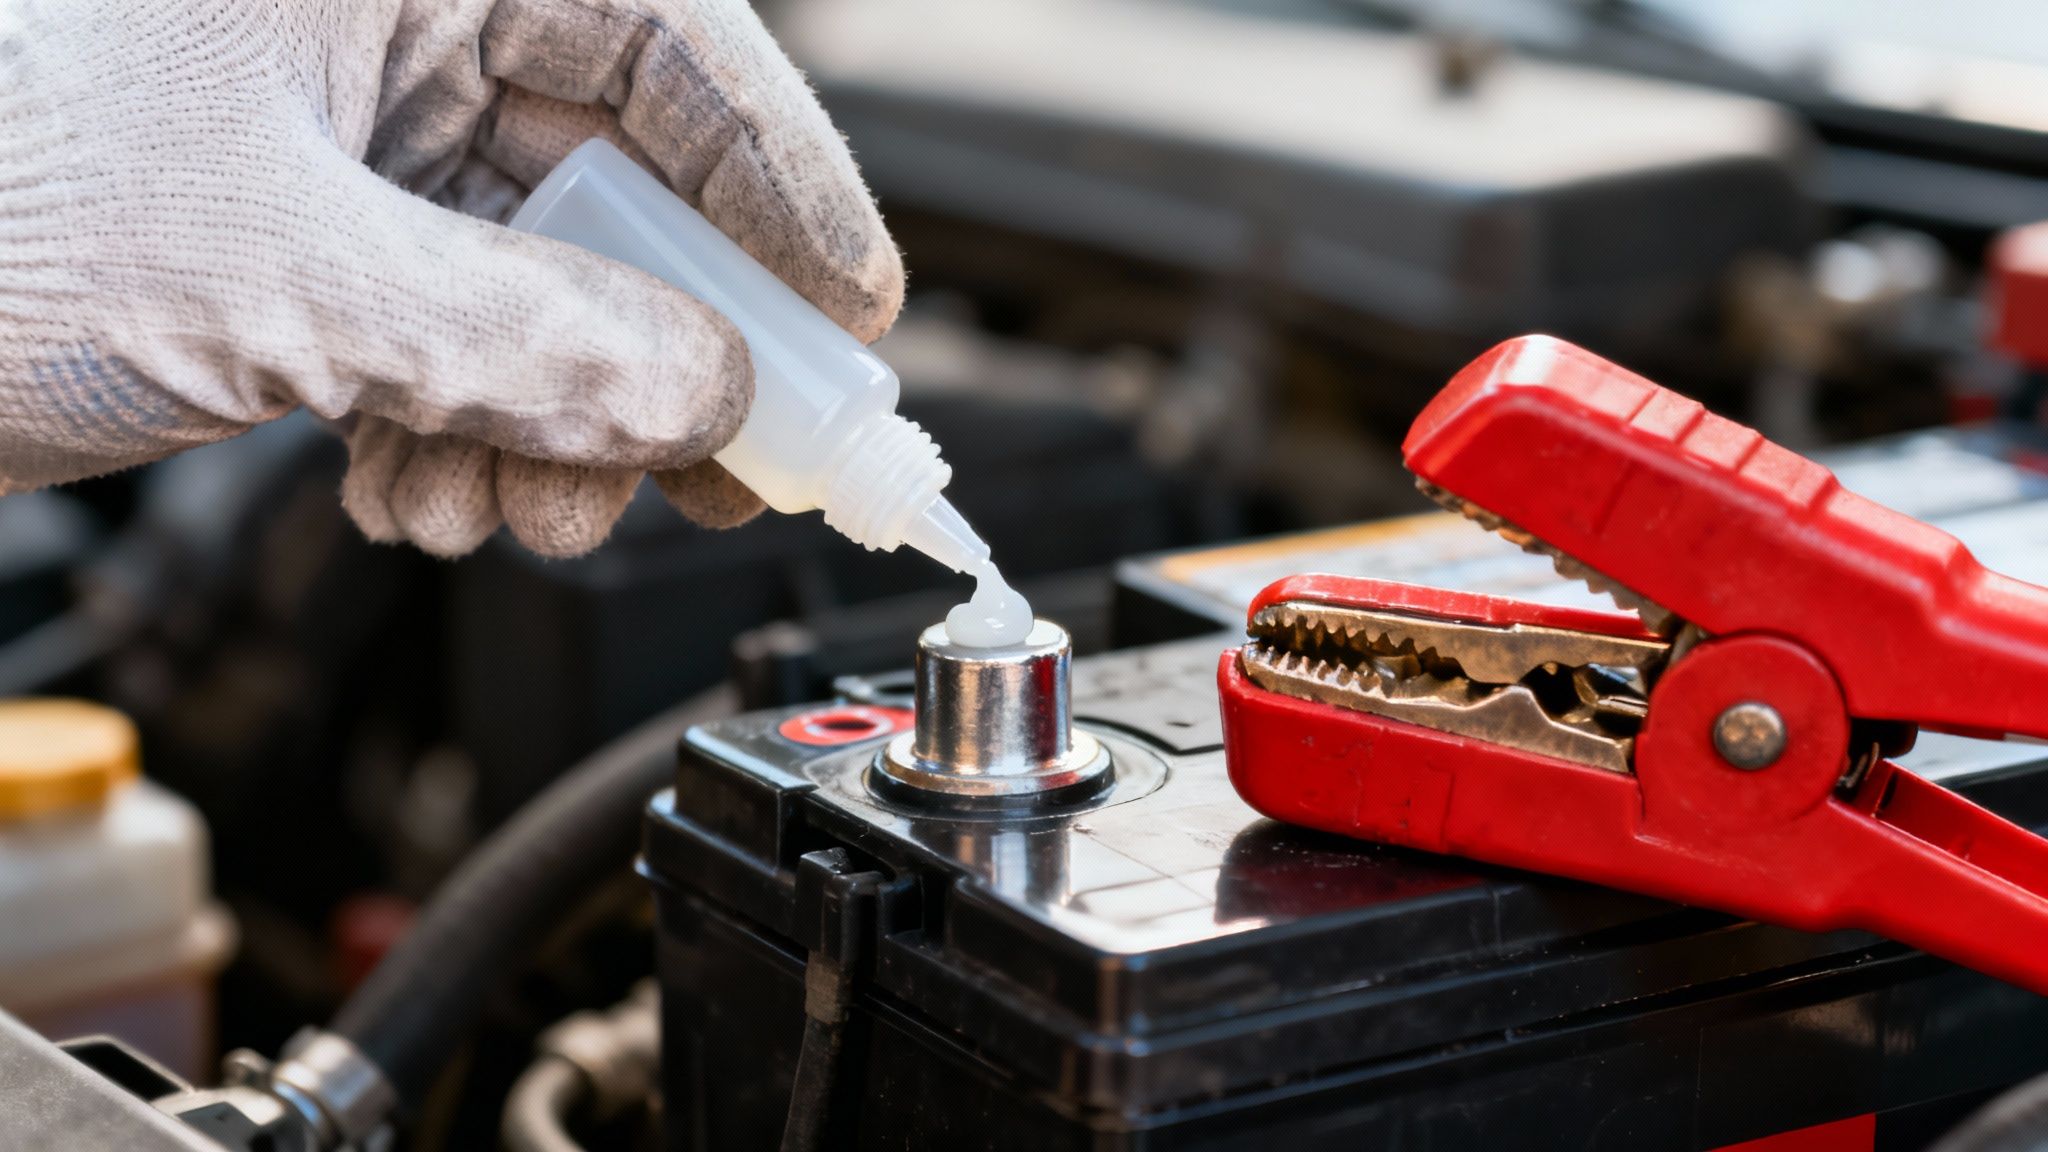
With the terminals clean and dry, the final steps involve reassembly and applying a protective layer to inhibit future corrosion. Once the battery terminals are clean and dry, apply a thin layer of dielectric grease or petroleum jelly to the terminals and clamps. This creates an airtight seal and acts as a protective layer, helping to prevent moisture and gases from causing new corrosion. You can also use an anti-corrosion spray, battery terminal protectant, or terminal protectant to provide an additional barrier against moisture, dirt, and acid, further delaying future buildup. Regularly applying a terminal protectant every few months helps maintain this protective barrier and ensures long-lasting, reliable performance.
Reconnect the battery cables in the reverse order of disconnection: attach the positive (red) cable first by placing the clamp over the post and tightening the nut until it is secure. The clamp should not be movable by hand. Avoid over-tightening, as this can damage the terminal post. Once the positive terminal is secure, reconnect the negative (black) cable last.
Selecting a Protective Coating
This preventative step creates a physical barrier that isolates the clean metal surfaces from atmospheric moisture and acidic battery fumes, acting as a protective layer to prevent corrosion and new corrosion from forming. Regularly applying a terminal protectant is essential to prevent corrosion and ensure optimal battery performance. This significantly extends the time between required cleanings.
Effective options include:
Dielectric Grease: A non-conductive, silicone-based compound that excels at sealing out moisture and oxygen. Apply a thin coat to the exterior of the terminals and clamps after they have been fully tightened.
Anti-Corrosion Sprays / Terminal Protectant: Specialized aerosol products designed to leave a protective, non-conductive film over the terminals. This terminal protectant acts as a protective layer—like armor or sunscreen—against moisture and corrosion, helping to prevent new corrosion from developing. They are easy to apply and provide visible coverage.
Terminal Protector Washers: Felt rings impregnated with an anti-corrosion chemical. These are placed over the battery posts before the cable clamps are reinstalled.
A frequent error is applying dielectric grease tightening the clamps. This can interfere with the metal-to-metal contact and increase electrical resistance. The grease should be used to seal the connection from the outside, not to coat the conductive surfaces.
This final measure is vital for maintaining long-term battery health, especially in climates with high heat and humidity like Plano. Unprotected terminals can show signs of new oxidation within 2–3 years. Proactive protection helps maintain a consistent charging voltage (typically between 13.8–14.4 volts), maximizing battery performance and lifespan, a topic of growing interest in research on the global battery terminal market.
When Professional Diagnosis is Necessary
While cleaning battery terminals is a valuable DIY skill, it is equally important to recognize situations that require professional expertise. Certain symptoms indicate problems that extend beyond surface corrosion and can pose safety risks if not addressed correctly.
If you observe that the battery’s plastic casing is cracked, bulging, or actively leaking electrolyte fluid, cease work immediately. A compromised battery case is a significant safety hazard and indicates an urgent need for professional replacement. If you suspect a failing battery—such as difficulty starting your vehicle or repeated electrical issues—a battery test performed by professionals can determine if you need a new battery. Professional services can also clean battery corrosion thoroughly and safely, and provide battery tests to assess the need for replacement, ensuring your vehicle remains reliable.
Identifying Deeper Electrical System Faults
If a meticulous cleaning of the terminals does not resolve starting issues, the root cause may be a poor connection at the terminals, which can affect sensitive electronics and overall vehicle performance. Other possibilities include a degraded battery that can no longer hold an adequate charge or a malfunction in the vehicle’s charging system, such as a failing alternator.
When a simple procedure does not yield the expected result, further DIY troubleshooting without proper diagnostic tools can lead to misdiagnosis and more costly repairs.
The ASE-certified technicians at Express Lube & Car Care in Plano utilize professional diagnostic equipment to accurately identify the source of electrical problems. We can perform a load test on the battery and check the output of the alternator to determine if a full car battery replacement is warranted. Seek professional assistance if you encounter any of the following:
Battery cables that are severely frayed, corroded internally, or physically damaged.
Terminal clamps that are distorted, cracked, or cannot be securely tightened.
Persistent starting difficulties that remain after the terminals have been thoroughly cleaned and protected.
These issues require professional attention to ensure a safe and reliable repair.
Frequently Asked Questions
Here are answers to some common questions regarding battery terminal maintenance.
How often should I inspect my battery terminals?
Check your battery terminals at least twice a year, or more frequently if you notice starting issues or electrical problems. Regular maintenance and taking the time to clean your battery can help prevent corrosion, ensuring a strong electrical connection and extending overall battery life.
What is the recommended inspection frequency for battery terminals?
It is advisable to inspect your battery terminals during every oil change, or at a minimum, biannually. In regions with high summer heat like Texas, the electrochemical process that causes corrosion can accelerate, making more frequent checks prudent.
Can carbonated beverages be used to clean corrosion?
While the phosphoric acid in cola can dissolve some corrosion, it is not a recommended method. It leaves behind a sugary residue that attracts dirt and moisture, potentially creating new electrical problems. A solution of baking soda and water is superior because it neutralizes the acid and can be rinsed away completely, leaving no harmful residue.
Diagnostic Tip: Observe the location of the corrosion. A small amount on the positive (red) terminal is common due to normal gassing. However, significant corrosion specifically on the negative (black) terminal can indicate that the vehicle’s charging system is undercharging the battery. If this pattern recurs after cleaning, a professional charging system test is recommended.
Why won’t my car start after cleaning the terminals?
If the vehicle still fails to start after a proper cleaning, the issue is not the electrical connection at the terminals. The problem lies deeper. Common causes include:
An aged battery that has lost its capacity to hold a sufficient charge.
A malfunctioning alternator that fails to recharge the battery during operation.
A parasitic draw, where a component is draining battery power while the vehicle is off.
At this stage, professional diagnosis is the most efficient path to a solution.
If you are facing a persistent electrical issue or prefer a professional service for your battery maintenance, the ASE-certified technicians at are here to assist. Schedule your visit online or visit our Plano location for reliable, expert service.