

Removing a car battery is a fundamental maintenance task that requires precision and a clear understanding of the process. The procedure is straightforward, but it involves a specific sequence to ensure safety. The cardinal rule of battery removal is to always disconnect the negative terminal first. Adhering to this sequence is the primary safeguard against electrical shorts, which can damage your vehicle's sensitive electronic systems or cause personal injury.
The Importance of Safe Battery Removal Procedures
A depleted battery is a common inconvenience, but improper removal can escalate the situation into a significant problem. Modern vehicles are complex systems, integrating numerous computer modules that control everything from engine performance to in-cabin infotainment. An accidental electrical surge, often caused by incorrect terminal disconnection, can damage these components, leading to costly repairs.
Furthermore, there are inherent physical risks. Automotive batteries contain sulfuric acid, a highly corrosive substance. Mishandling the battery can result in spills, which pose a risk of chemical burns and can damage the vehicle's paint and metal components.
Understanding the Risks of Improper Removal
A hurried or uninformed approach to battery removal can lead to several preventable issues.
- Electrical System Damage: Disconnecting the positive terminal first creates a hazardous situation. If the metal wrench contacts the positive terminal and any part of the car's grounded chassis simultaneously, it completes a circuit. This results in a powerful short circuit, capable of damaging electronic control units (ECUs).
- Personal Injury: During their normal operation, lead-acid batteries can vent small amounts of hydrogen gas, which is flammable. A spark from a short circuit can ignite this gas, potentially causing a small explosion that could spray corrosive acid. This is why wearing safety glasses and gloves is a mandatory precaution.
- Component Damage: A careless removal process can damage the battery terminals, cable clamps, or the new battery. This could compromise the new connection and result in a persistent no-start condition.
A frequent and critical error is the removal of the positive terminal while the negative terminal is still connected. Should a metal tool bridge the gap between the positive post and the vehicle's frame, a high-amperage short circuit occurs. This can generate an intense arc, capable of welding the tool to the chassis.
Industry data highlights that improper battery handling is a significant factor in roadside assistance calls, contributing to an estimated 30% of such incidents. Furthermore, sulfuric acid corrosion on terminals is observed in 20-30% of cases where maintenance is not performed correctly.
For drivers in Plano who prefer a professional service, the ASE-certified technicians at Express Lube Plano can perform the removal and replacement safely and efficiently. To learn more about advancements in this field, one can explore the global automotive battery market.
Essential Toolkit for a Safe Removal
Before beginning the removal process, it is crucial to prepare your workspace and assemble the necessary tools. This methodical approach ensures safety and efficiency.
Park the vehicle on a flat, level surface, preferably in a well-ventilated area like an open garage. The ventilation is necessary to disperse any hydrogen gas that the battery may vent. Ensure the engine is switched off and the keys are removed from the ignition.
Assembling Your Equipment
Having the correct tools readily available streamlines the process. A basic automotive toolset is generally sufficient for this task.
This table outlines the essential items for a safe and effective battery replacement.
| Item | Specification/Type | Purpose |
|---|---|---|
| Safety Glasses | ANSI-Rated | Protects eyes from potential acid splashes and electrical arcs. This is a non-negotiable safety measure. |
| Acid-Resistant Gloves | Nitrile or Rubber | Prevents skin contact with corrosive battery acid. |
| Socket & Ratchet Set | 8mm – 13mm Sockets | A wrench in the 8-13mm range fits approximately 95% of vehicles. A 10mm socket is the most common size needed. |
| Battery Terminal Brush | Wire Brush Tool | Effectively cleans corrosion from battery posts and cable clamps to ensure a secure connection. |
| Baking Soda & Water | Small container | Creates a solution to neutralize any spilled battery acid on the battery tray or chassis. |
Equipped with these tools, you are prepared to execute the task safely and correctly.
The automotive battery aftermarket is experiencing significant expansion, with a projected growth rate of 17.95%. As more individuals undertake DIY automotive repairs, adherence to safety protocols becomes paramount. Statistics indicate that an estimated 65% of DIY removal attempts result in sparks when a grounded tool makes contact with the positive terminal. Annually, hydrogen gas explosions cause injuries to approximately 5% of DIYers.
Professionals, through standardized procedures, reduce the incidence of such mistakes by over 90%. This underscores the value of services like those offered at Express Lube Plano, which provide a safer alternative. You can learn more about these market trends and insights to understand industry dynamics.
The most critical safety principle is tool awareness. A metal wrench must never simultaneously touch the positive battery terminal and a grounded metal part of the vehicle. This action creates an immediate short circuit, resulting in a hazardous shower of sparks.
The Correct Disconnection Sequence
With your tools and safety equipment prepared, you can proceed with the disconnection. The order of operations is the most critical aspect of the entire procedure. Following the correct sequence is essential for a safe outcome.
First, you must locate the battery. In most vehicles, it is situated under the hood to one side of the engine. However, some manufacturers place the battery in the trunk, under a rear seat, or beneath the floor to improve weight distribution. Your vehicle's owner's manual will specify its exact location.
Once located, identify the positive (+) and negative (-) terminals. The positive terminal is typically marked with a red plastic cover and a “+” symbol. The negative terminal often has a black cover or no cover and is marked with a “–” symbol.
This workflow diagram illustrates the essential preparatory steps before you begin the disconnection.
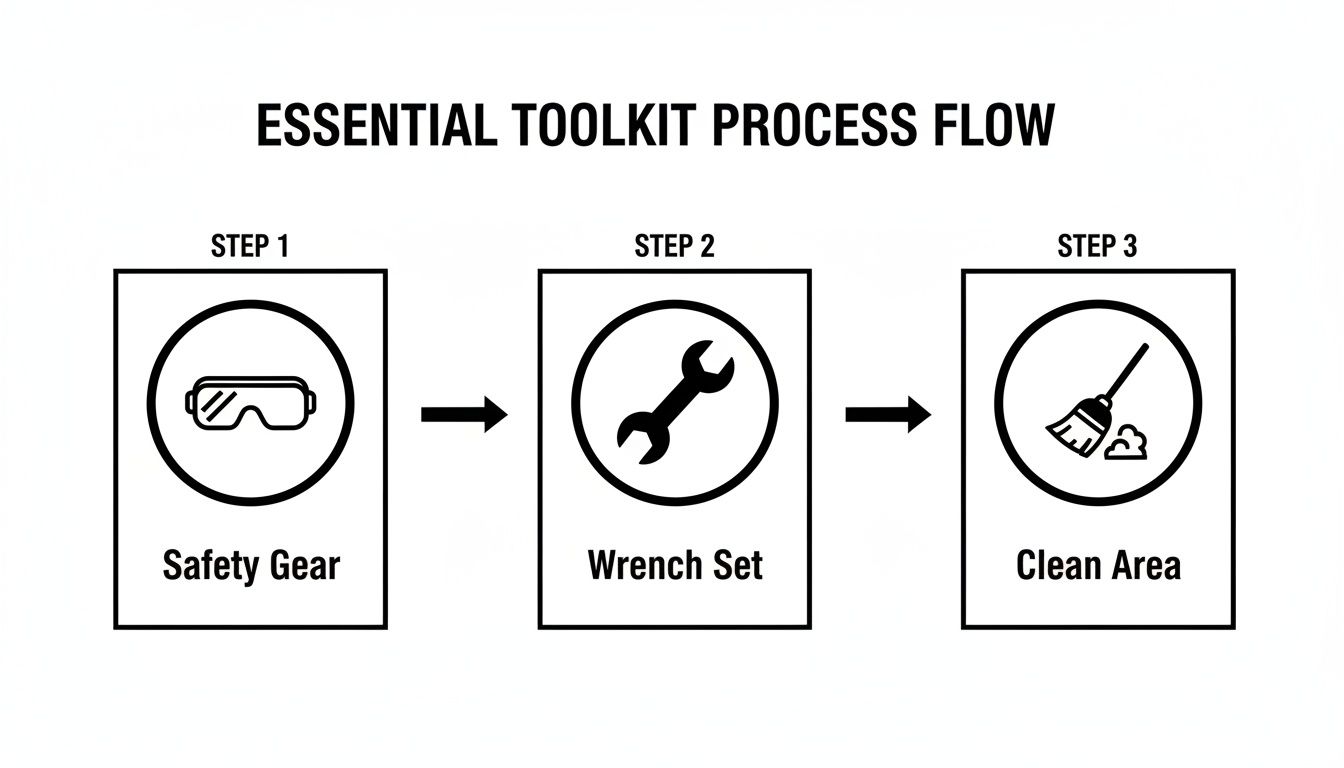
This visual serves as a reminder to equip yourself with safety gear, select the appropriate tools, and ensure your workspace is clear.
Step 1: Disconnect the Negative Terminal First
This is the non-negotiable first step. Always disconnect the negative terminal before any other connection.
The reason for this sequence is based on how automotive electrical systems are designed. The negative battery cable connects directly to the vehicle's chassis, which serves as a common ground for the entire electrical system. By removing this connection first, you interrupt the circuit's return path.
This effectively isolates the battery from the vehicle's electrical ground. Consequently, if your wrench were to accidentally contact the positive terminal and a metal part of the engine or frame later in the process, no short circuit would occur. The electrical path has been safely broken.
An analogy is shutting off the main water supply to a house before repairing a faucet. By first cutting off the ground connection (the source), you can work on the rest of the system without risk of an electrical "flood"—in this case, an arc of sparks that could cause damage or injury.
Use a wrench (typically a 10mm) to loosen the nut on the negative terminal clamp. It is only necessary to loosen it enough to remove the clamp; do not remove the nut completely. Gently twist the cable clamp and lift it vertically off the battery post. If it is stuck, avoid prying it with a screwdriver, which can damage the post. Instead, wiggle it firmly until it comes free.
Once disconnected, secure the cable away from the battery post to prevent accidental reconnection.
Step 2: Proceed to the Positive Terminal and Hold-Down Bracket
With the ground connection severed, it is now safe to work on the positive side. Use your wrench to loosen the positive terminal clamp in the same manner as the negative one. Wiggle the clamp to free it and move the cable aside.
Finally, remove the hold-down bracket that secures the battery to its tray. This is typically a bar held in place by one or two long bolts. A socket extension may be required to reach them. Once the bracket is removed, the battery is ready to be lifted out of the vehicle.
This sequence is a critical safety protocol. In the Plano area, battery-related issues account for 42% of AAA service calls, with many problems arising from incorrect DIY procedures. Following the "negative-off-first, positive-off-second" rule is estimated to prevent 80% of accidental arcing risks.
With nearly 159 million new automotive lead-acid batteries entering the North American market, understanding safe handling procedures is crucial. You can learn more about the scale of the automotive lead-acid battery market to appreciate the importance of these safety standards.
Lifting the Battery and Cleaning the Tray
With the terminals and bracket disconnected, the battery can now be removed. Car batteries are dense and surprisingly heavy; the average unit weighs between 40 and 60 pounds. Lifting this weight from a constrained engine bay requires proper technique.
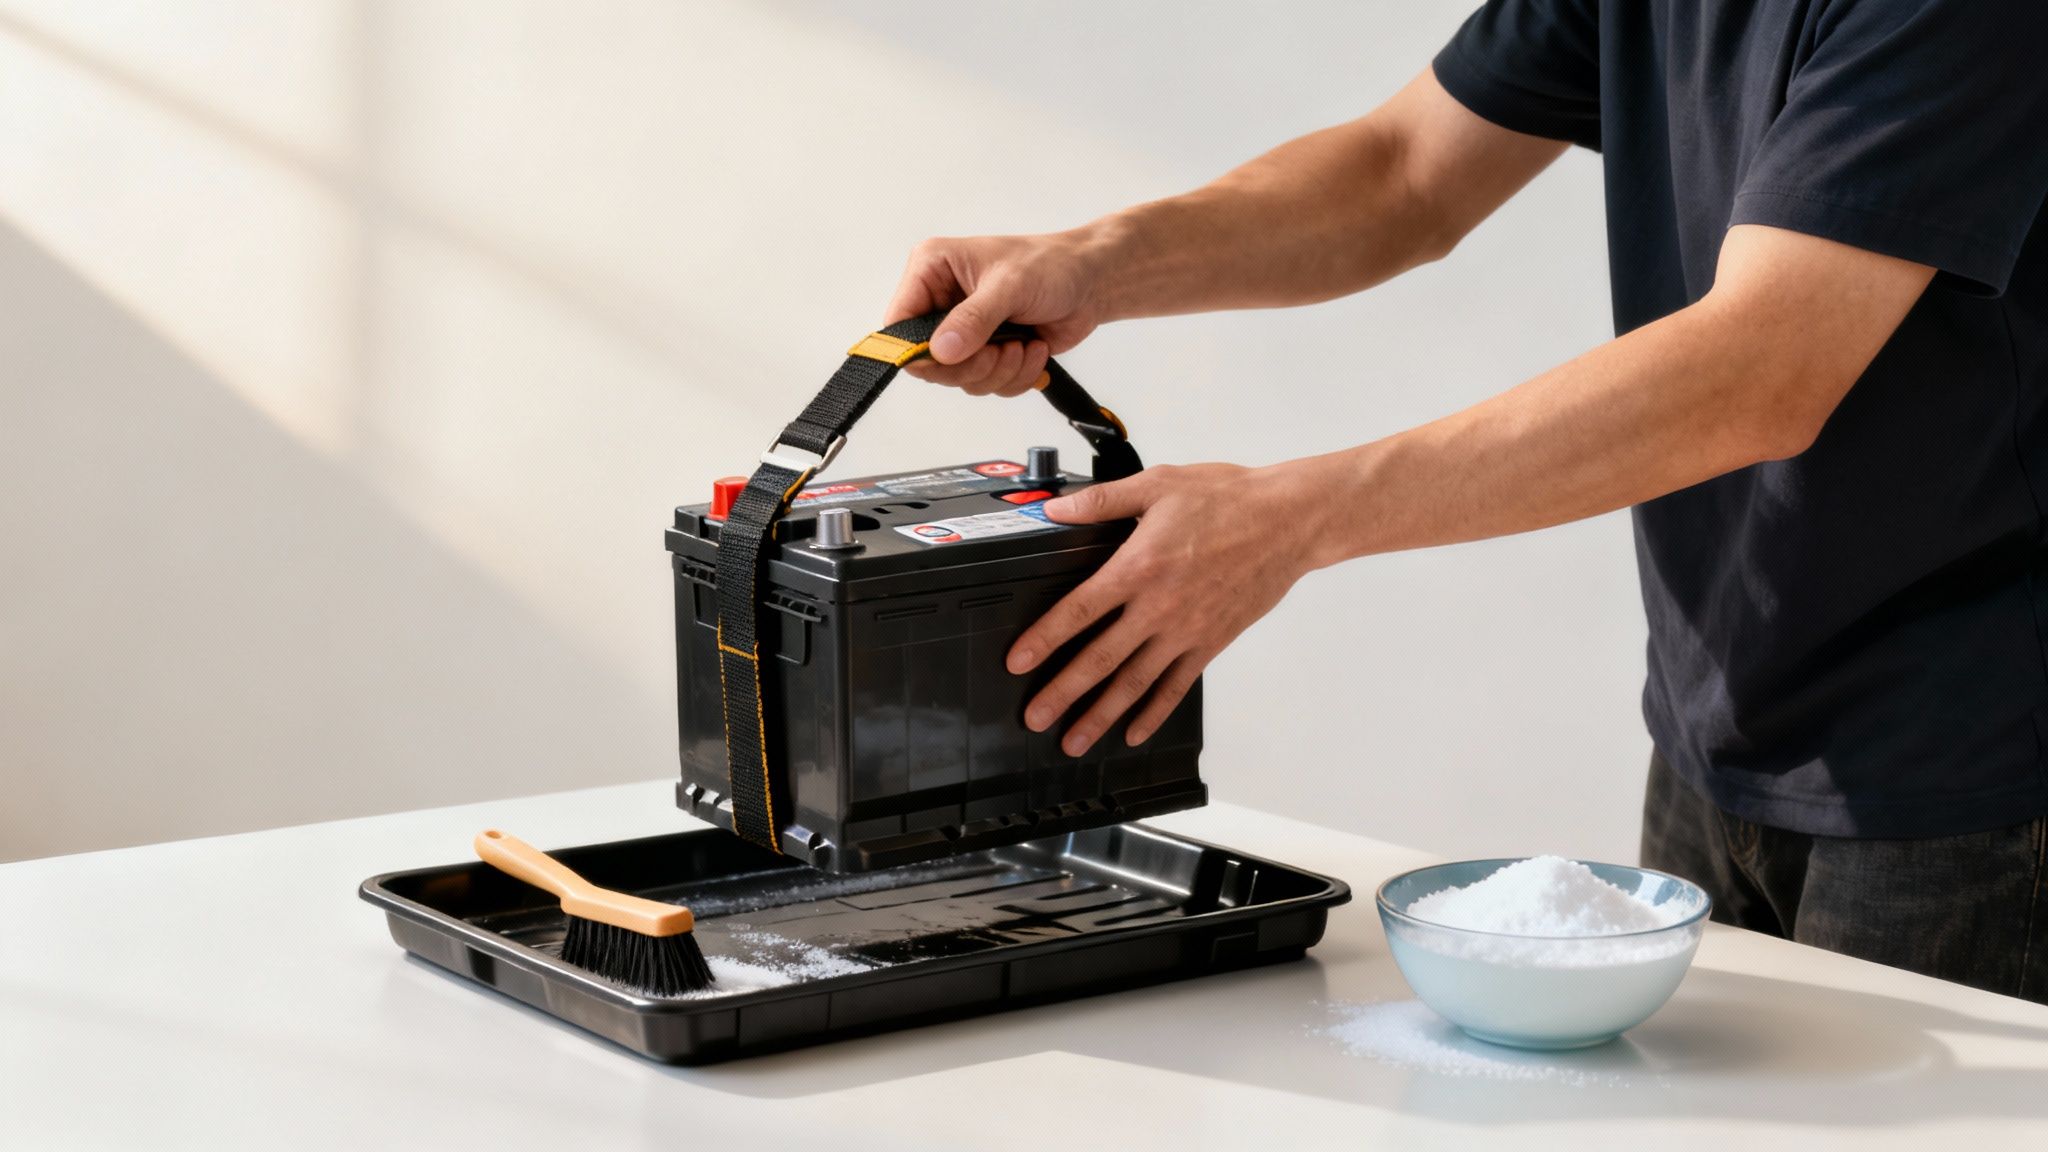
To prevent injury, use proper lifting ergonomics: bend at the knees, not with your back. Secure a firm grip on the battery and lift vertically. If the battery is equipped with a thin plastic handle, consider using a dedicated battery carrier strap. This tool provides a more secure grip and reduces the risk of dropping the battery or straining your back.
Preparing the Tray for the New Battery
After removing the old battery, inspect the battery tray and cable clamps. It is common to find a white or bluish crystalline deposit. This substance is lead sulfate, a product of battery acid corrosion. It is crucial to remove this corrosion before installing the new battery.
This corrosive material can degrade metal components over time and, more immediately, can interfere with the electrical connection of the new battery, leading to starting and charging problems.
A clean battery tray and terminals are foundational for a reliable, long-lasting electrical connection. This step prepares a clean contact surface for the new battery, ensuring optimal power delivery and charging efficiency from the outset. Neglecting this step is a common DIY oversight.
A simple, effective cleaning solution can be made from common household items.
- Prepare a Neutralizing Agent: Mix one or two tablespoons of baking soda with a small amount of water to form a paste.
- Apply and Scrub: Use a stiff brush (an old toothbrush or a terminal cleaning brush) to apply the paste to all corroded areas, including the tray, bracket, and the inside surfaces of the terminal clamps.
- Observe the Reaction: The paste will fizz and bubble as it neutralizes the acid.
- Rinse and Dry: Once the fizzing ceases, rinse the area with a small amount of clean water and thoroughly dry all components with a clean cloth. The area must be completely dry before installing the new battery.
For a more comprehensive guide on this maintenance task, our article on how to clean car battery terminals offers additional details. Investing a few minutes in this step will contribute to the long-term performance and reliability of your new battery.
Proper Disposal and When to Consult a Professional
With the old battery removed, the final step is its proper disposal. Automotive batteries are classified as hazardous waste due to their lead and sulfuric acid content. They must not be disposed of in regular household trash, as these materials can contaminate the environment.

Fortunately, lead-acid batteries are among the most successfully recycled consumer products. Approximately 99% of all lead-acid batteries are recycled, a rate that surpasses that of many other recyclable materials. This process reclaims valuable lead and plastic, preventing harmful substances from entering landfills.
Options for Responsible Disposal
Residents in and around Plano have several convenient and responsible options for battery disposal, some of which may offer a financial incentive.
- Return for a Core Charge Refund: Most retailers that sell new car batteries add a "core charge" to the purchase price. This fee is a deposit that is refunded when you return your old battery. Bring the old unit to the point of purchase to receive your refund and ensure it is recycled correctly.
- Drop Off at a Service Center: Reputable automotive service centers, including Express Lube & Car Care, accept old batteries for recycling. This is a convenient option if you have lost your purchase receipt or simply require a drop-off location.
Avoid storing an old car battery in a garage or shed indefinitely. Over time, the casing can degrade and leak acid, creating a hazardous corrosive spill that can damage concrete floors and other stored items.
When to Defer to a Professional
While removing a car battery is a manageable task for many, there are circumstances where professional assistance is the wiser and safer choice.
Consider seeking professional help in the following situations:
- Inaccessible Battery Location: In some vehicles, the battery is not easily accessible under the hood. It may be located under a fender, in the trunk, or beneath a seat, requiring the removal of other components to gain access.
- Complex Electrical Systems: Many modern vehicles require a memory saver device to be plugged into the OBD-II port during battery replacement. This device provides low-voltage power to maintain settings for the radio, clock, and, most importantly, the powertrain control module's adaptive memory.
- Severe Corrosion: If the terminals are heavily corroded to the point where they seem fused to the battery posts, do not apply excessive force. This could damage the cable clamps or crack the battery casing, leading to an acid leak.
In these scenarios, a seemingly simple task can become complex. Professional technicians possess the specialized tools and expertise to manage these challenges safely and efficiently. If you are uncertain at any point, consulting a professional can prevent costly mistakes.
Maintaining battery health is also crucial. You can learn more in our guide on how to properly charge a car battery.
Frequently Asked Questions About Car Battery Removal
Even a seemingly straightforward procedure can prompt questions. Clarifying these common points beforehand can help ensure a smooth and successful process.
Is a Memory Saver Device Necessary?
For most vehicles manufactured since the early 2000s, using a memory saver is highly recommended. This device connects to the vehicle's OBD-II port (typically located under the dashboard) and supplies a low-voltage current while the main battery is disconnected.
Without it, you will lose convenience settings like radio presets and the clock. More critically, the adaptive memory in the engine and transmission control units may be erased. This can result in temporary drivability issues, such as rough idling or erratic shifting, until the vehicle relearns your driving habits. It is a small preventative measure that can avert significant inconvenience.
For luxury vehicles or those with advanced infotainment and driver-assist systems, a memory saver is essentially mandatory. Power interruption in these vehicles can trigger anti-theft systems or require a visit to the dealership for system recalibration, turning a simple DIY task into an expensive endeavor.
What Is the White Powder on My Battery Terminals?
The crystalline white or bluish deposit is lead sulfate, commonly known as battery corrosion. It forms when sulfuric acid vapor from the battery reacts with the ambient air and the metal of the terminals.
This buildup acts as an insulator, impeding the flow of electricity. It can prevent a vehicle from starting or inhibit the proper charging of a new battery. Cleaning it is not merely cosmetic; it is essential for electrical system performance.
- The Problem: Corrosion introduces high electrical resistance into the starting and charging circuits.
- The Solution: A wire brush and a paste of baking soda and water will neutralize the acid and allow you to scrub the terminals and clamps back to clean metal.
- Safety Precaution: Always wear gloves and safety glasses during cleaning, as the corrosion dust is hazardous and should not contact your skin or eyes.
How Can I Confirm My Battery Is No Longer Serviceable?
Symptoms like slow engine cranking and dim headlights are strong indicators, but a definitive diagnosis requires a voltage test. A healthy, fully charged battery should register approximately 12.6 volts or slightly more when measured with a multimeter while the engine is off.
A reading below 12.4 volts suggests the battery is losing its capacity to hold a full charge and is likely nearing the end of its service life. For a comprehensive assessment, most auto parts stores offer free battery testing. Their equipment can measure the Cold Cranking Amps (CCA), which is the true indicator of a battery's ability to start an engine in cold conditions. If you require a professional diagnosis or a timely car battery replacement, our team can provide expert service.
If you encounter a difficult removal or prefer to have the task handled by experienced professionals, the ASE-certified technicians at Express Lube & Car Care are here to assist. We perform battery replacements daily with safety and efficiency. Visit us at your convenience; no appointment is necessary. https://www.expresslubeplano.com