

That little maintenance light usually shows up at the worst time. You’ve got work in the morning, the kids need to be somewhere, and the last thing you want to do is wonder whether your engine oil is overdue.
If you’re thinking about learning to change oil and filter yourself, you’re not alone. For a lot of Plano drivers, it starts as a money question, then turns into a confidence question. Can I do this safely? Can I do it without making a mess? Can I trust myself not to miss something important?
The good news is that an oil change is one of the most approachable jobs you can do on a car. The better news is that you don’t have to treat it like a test. If you’ve got a safe place to work, the right supplies, and a little patience, it’s a solid DIY project. If you don’t, there’s no shame in handing it off to a fast local shop and buying back your afternoon.
Why Change Your Own Oil and Filter
A lot of people decide to learn this job right after they get hit with a basic maintenance reminder and realize they’ve been putting it off. That’s usually when the old advice starts flying around. One person says every 3,000 miles, another says modern oil lasts much longer, and now you’re trying to sort out what applies to your car.
Oil change intervals have changed a lot. What used to be treated as a 3,000-mile routine has stretched on many modern vehicles to 7,500 to 10,000 miles or more, and for someone driving 15,000 miles a year, that can mean saving over $300 annually compared with older service habits, as explained by Car and Driver’s review of modern oil change intervals.
Why DIY appeals to people
When neighbors ask me why anyone still changes their own oil, the answer is usually a mix of three things:
- Control over the parts used. You know exactly what oil went in and which filter is on the engine.
- A closer look at the vehicle. You’ll often spot a seep, torn splash shield, or loose fastener while you’re under there.
- A useful skill. Once you’ve done it once, the job feels a lot less mysterious.
There’s also satisfaction in it. You pull the drain plug, swap the filter, refill carefully, check the dipstick, and know the job’s done right because you watched every step.
Practical rule: DIY is smart when you have time, a flat work area, and you’re willing to follow the details instead of rushing.
Why the filter matters too
Some first-timers think of the filter as optional, especially if the old one “still looks fine.” That’s a mistake. Oil and filter work as a pair. Clean oil pushed through a tired filter doesn’t give you the protection you think it does.
If you want a deeper look at that relationship, this guide on how often to change an oil filter is worth reading before you buy parts.
Gathering Your Tools and Supplies
Before you touch the car, get every tool and supply in one place. That keeps you from crawling out from under the vehicle with oily hands because you forgot the funnel or bought the wrong filter.
The owner’s manual is your first tool. It tells you the oil viscosity, oil capacity, and often whether the manufacturer specifies conventional, synthetic blend, or full synthetic. If you’re unsure which is right for your vehicle and driving pattern, this comparison of synthetic vs conventional oil can help you sort out the trade-offs.
DIY oil change checklist
| Item | Purpose | Pro Tip |
|---|---|---|
| Correct engine oil | Lubricates moving parts and carries away contaminants | Match the viscosity and specification in the owner’s manual exactly |
| New oil filter | Traps contaminants in the oil | Buy the exact filter for your engine, not just one that “looks close” |
| Socket wrench and correct socket | Removes the drain plug cleanly | A proper socket grips better than an adjustable wrench and lowers the chance of rounding the plug |
| Oil filter wrench | Helps remove a stuck or awkwardly placed filter | Get the style that fits your filter location, cap-style or strap-style |
| Drain pan | Catches old oil | Use one with a wide opening so you don’t miss the stream when the plug comes out |
| Funnel | Helps refill without spilling | Keep one dedicated to oil only |
| Jack and jack stands or ramps | Raises and supports the vehicle safely | Never rely on the jack alone once you’re under the car |
| Wheel chocks | Prevents rolling | Chock the wheels that stay on the ground |
| Gloves and shop towels | Keeps your hands clean and improves grip | Nitrile gloves make cleanup much easier |
| Replacement drain plug washer if required | Helps seal the drain plug correctly | Check whether your vehicle uses a crush washer or sealing washer |
| Cardboard or absorbent mat | Protects the driveway or garage floor | It also helps you spot fresh drips after the job |
| Owner’s manual | Confirms oil type, capacity, and sometimes torque guidance | Keep it open during the job instead of relying on memory |
Buy parts like a pro
Here’s the simplest way to avoid the most common shopping mistake. Use year, make, model, engine size every time you look up oil or filters. A lot of vehicles have multiple engine options, and the wrong filter can thread on but still be incorrect.
A few practical checks before you leave the parts counter:
- Compare gasket diameter. The old and new filter should have a matching sealing surface.
- Check the drain plug washer. Some cars seal fine with a reusable setup, some really need a fresh washer.
- Read the bottle label. Don’t stop at viscosity. Make sure it matches the required spec listed in your manual.
Lay everything out in order before you start. Oil, filter, tools, pan, funnel, towels. A clean setup makes a cleaner job.
Preparing Your Vehicle for the Oil Change
Preparation decides whether this job feels simple or stressful. Most oil change mistakes happen before the drain plug ever comes loose.
Start by parking on level ground. Set the parking brake. If the car has been running, let it cool enough that you won’t burn yourself, but don’t wait until it’s stone cold if you can help it. Slightly warm oil drains more easily than thick, cold oil.
Warm it a little, not a lot
You want the oil warm enough to flow, not hot enough to hurt you. A short drive or a few minutes of idle time is usually enough. Then shut the engine off and keep the keys out of the ignition so nobody starts it while you’re working.
Plano driving can be harder on oil than people realize. Frequent short trips and stop-and-go driving can contaminate oil faster with moisture and fuel, which can push some vehicles into a 3,000 to 5,000-mile severe-service range even if the manual’s normal schedule is longer, as noted in this discussion citing the U.S. Department of Energy observation on short-trip contamination.
Lift and support the car safely
If your vehicle sits high enough for safe access, you may not need to lift it. If you do need more room, use ramps or a floor jack with jack stands placed at the correct support points.
This is the one rule nobody should bend: never get under a vehicle supported only by a jack.
Use this routine:
- Chock the wheels that stay on the ground.
- Raise the vehicle at the proper jack point.
- Set it down on jack stands placed on solid, approved support points.
- Give the car a firm shake test before you slide under it.
Set the area up for less mess
Put cardboard under the engine area. Place your drain pan within reach. Keep the socket, filter wrench, towels, and new filter nearby so you’re not climbing in and out repeatedly.
A calm setup makes the rest of the work much easier. When people rush this part, they usually end up wearing oil, dropping the drain plug into the pan, or forgetting a step.
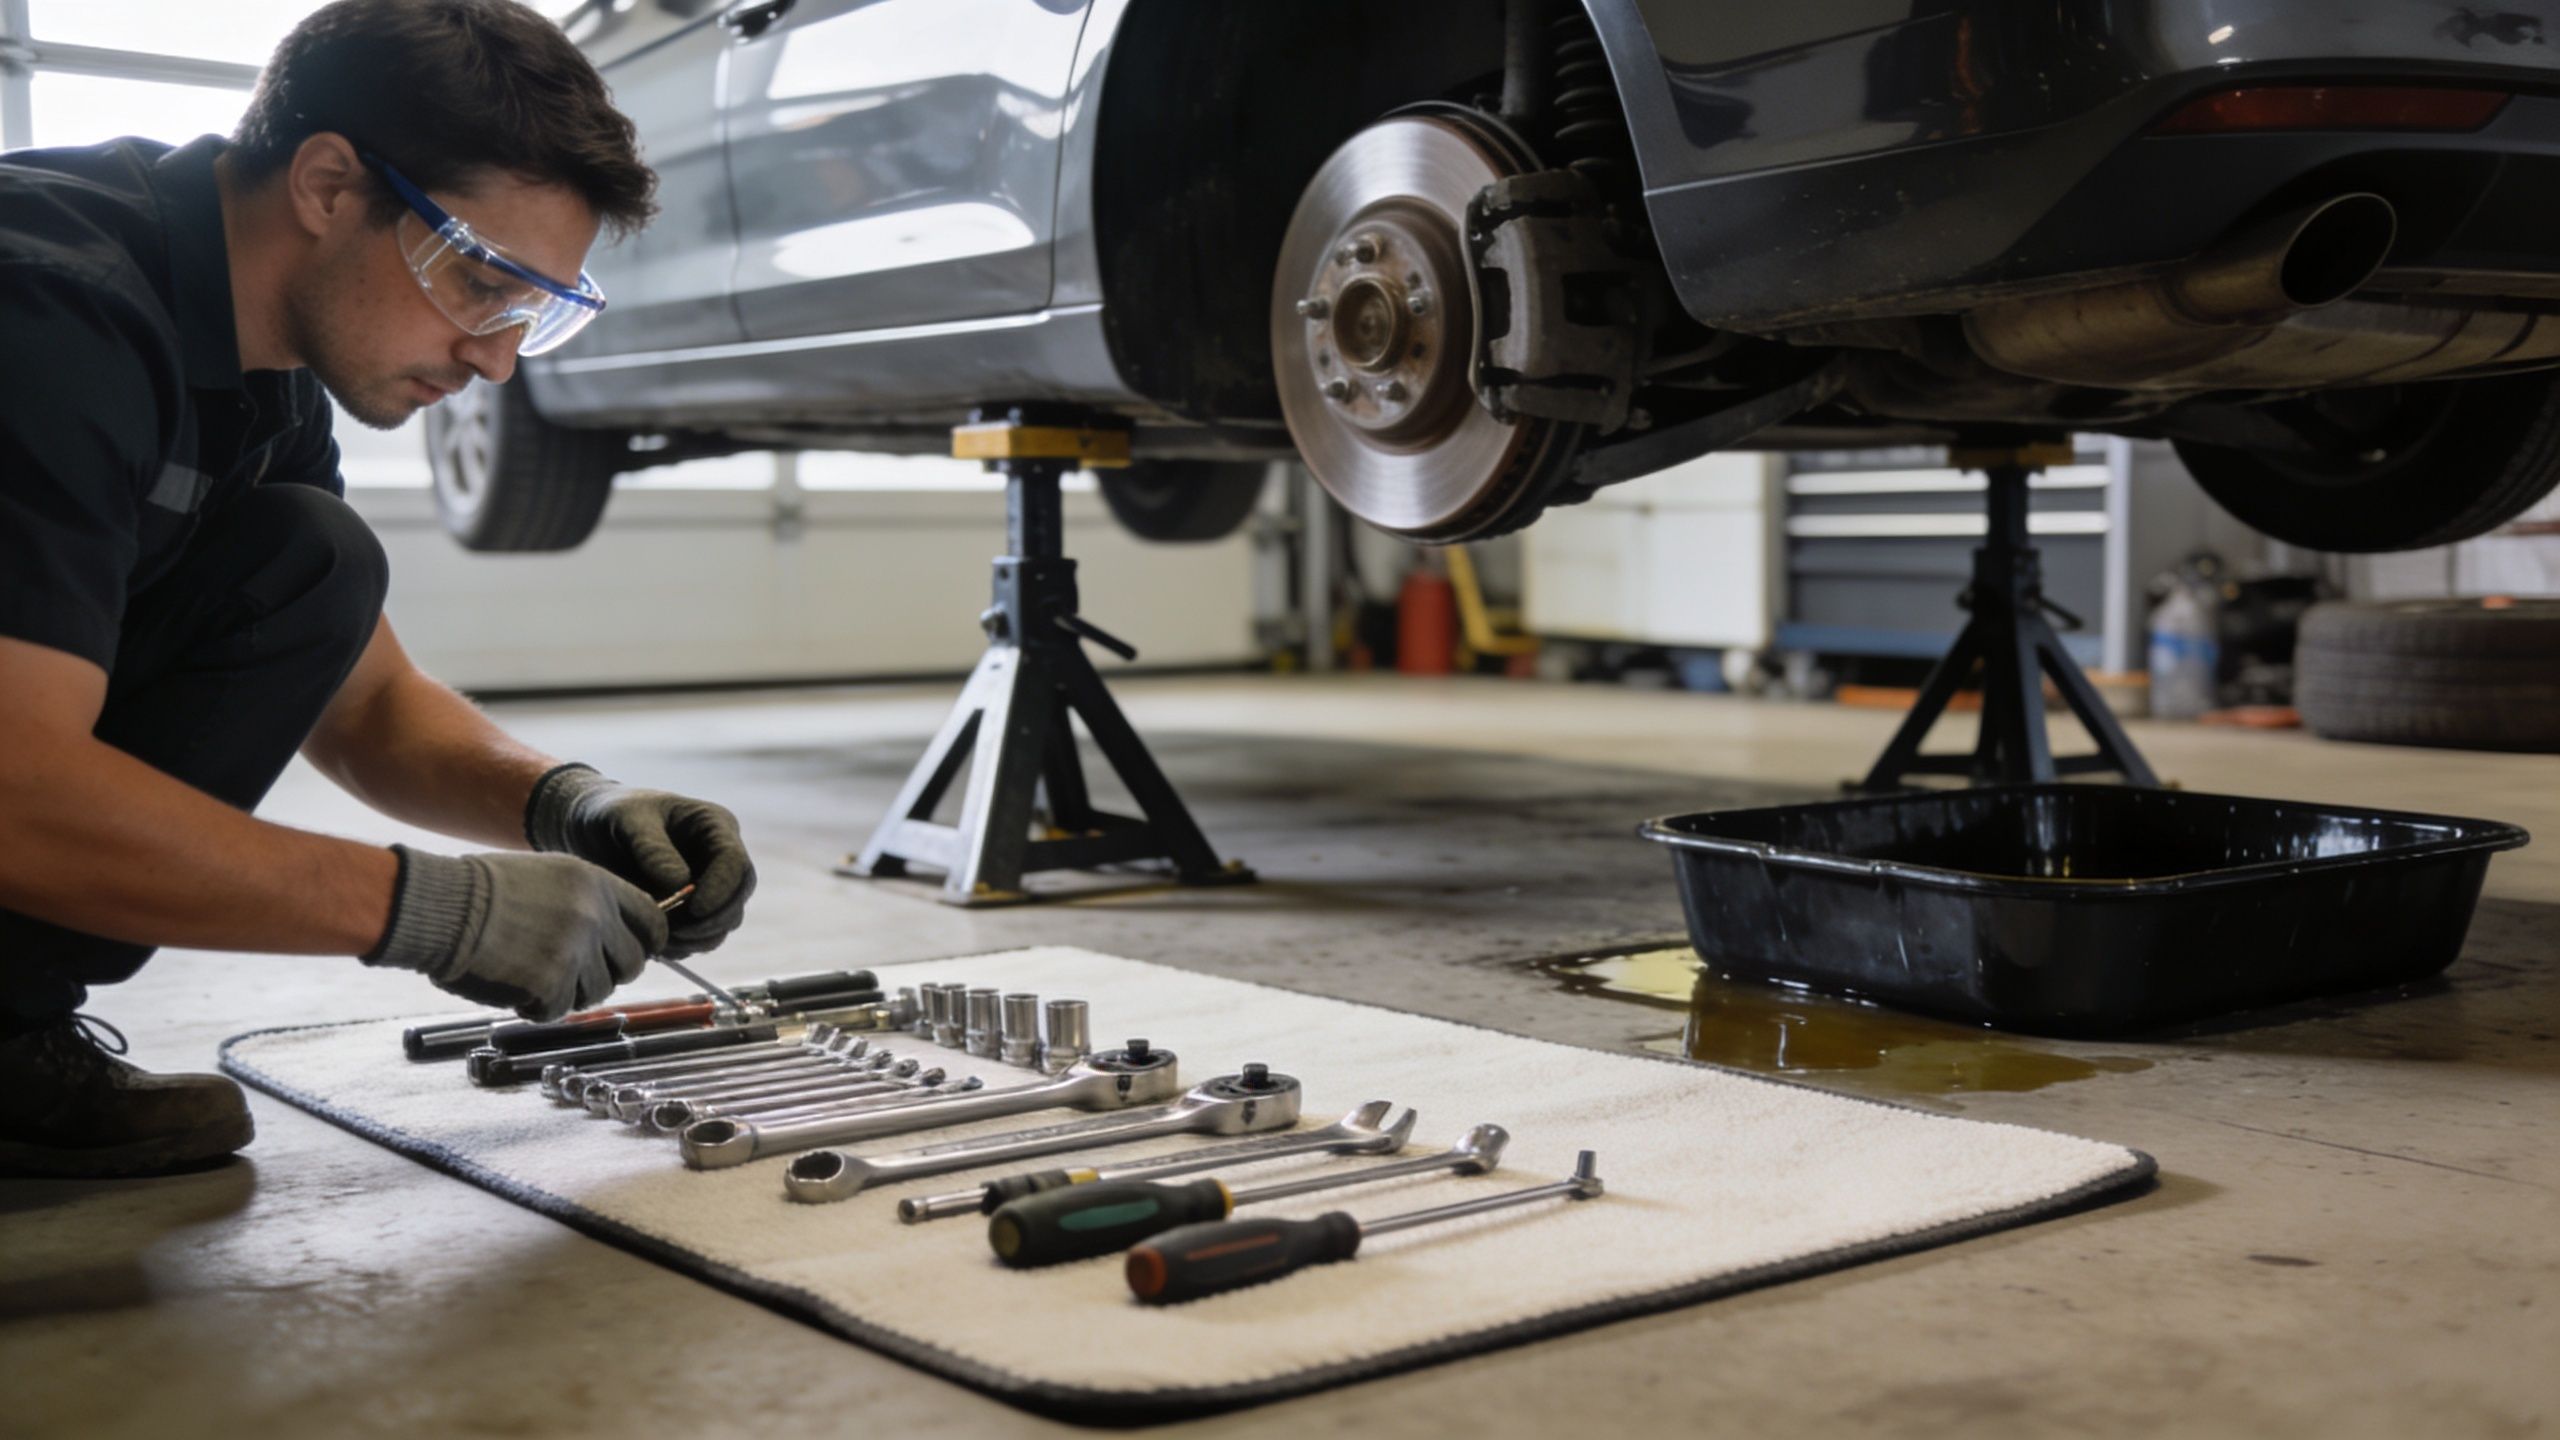
Draining the Oil and Replacing the Filter
This is the part most first-timers worry about, but it’s straightforward when you slow down and pay attention to what you’re touching. The goal is simple. Get the old oil out, remove the used filter, install the new filter correctly, and seal everything back up without leaks.

Find the right plug and filter
Slide under the front and locate the oil pan. The drain plug will be at the bottom or side of that pan. Don’t guess. On many vehicles, the transmission pan has a plug too, and draining the wrong fluid turns a basic maintenance job into a tow bill.
A few ways to confirm you’ve got the right one:
- Look at pan shape. The engine oil pan is usually at the bottom of the engine.
- Trace the filter location. The oil filter will be mounted to the engine, not the transmission.
- Check from above first. Sometimes spotting the filter from the engine bay helps you understand where it sits below.
The standard maintenance rule is simple. Replace the oil filter every time you change the oil. For conventional oil, that usually means every 3,000 to 5,000 miles, and in dusty conditions a cheap filter can let the oil become abrasive enough to increase wear, according to Champion Auto Parts’ guidance on oil filter replacement.
Break the drain plug loose
Set the drain pan slightly behind the drain plug, because oil often comes out in an arc at first instead of dropping straight down. Fit the socket squarely on the plug and turn it carefully.
That first break can feel tight. That’s normal.
Once the plug is loose, switch to your fingers and keep light inward pressure on it while you unscrew it. That little trick helps prevent oil from rushing out before you’re ready. Then pull the plug away quickly and let the oil drain.
Keep hold of the drain plug. Fishing it out of a full pan is messy, and dropping it in gravel is worse.
Let it drain fully
Give the oil time. Don’t rush to reinstall the plug the moment the heavy stream slows down. Let it continue until it becomes a light drip.
While it drains, inspect the plug and washer. Clean the plug with a towel and look at the threads. If the washer is damaged or your vehicle uses a replaceable crush washer, install the correct new one before the plug goes back in.
Remove the old filter
Move the drain pan under the filter before you loosen it. Even after the engine drains, the filter usually still holds oil.
Spin the filter off by hand if you can. If it’s too tight or in a cramped spot, use the filter wrench carefully. As soon as it breaks free, tip the open end upward as you remove it so you don’t dump oil down your arm.
One detail matters here more than many people realize. Check the mounting pad on the engine and make sure the old filter’s rubber gasket is not still stuck to it. A double gasket is a classic leak cause.
Here’s a visual walkthrough if you like seeing the process before doing it yourself.
Install the new filter correctly
Take a little fresh oil on your fingertip and wipe it around the new filter’s rubber gasket. That helps it seat smoothly and seal properly.
Then thread the new filter on by hand only. It should spin on smoothly. If it feels crooked, stop and start again. Cross-threading a filter is the kind of mistake that can turn into an instant leak.
Once the gasket contacts the mounting surface, tighten according to the filter instructions. In most cases, that means snug by hand, then a bit more. Don’t crank on it like a lug nut.
Reinstall the drain plug
Wipe the area around the drain hole clean. Thread the plug in by hand first so you know it isn’t cross-threaded. Then tighten it with the socket.
The best habit here is patience. A stripped oil pan thread can turn a basic DIY job into a repair appointment fast. Tight is good. Forced is bad.
One quick check before you crawl out
Before you move on, pause and scan your work:
- Drain plug installed
- Washer in place if required
- New filter installed
- Old gasket not stuck on engine
- No tools left under the vehicle
That quick check saves a lot of headaches.
Finishing the Job and Responsible Disposal
Once the plug and filter are secure, lower the vehicle if needed and refill the engine from the top. Use a funnel and pour in most of the required amount first, not all of it at once.
Then wait a moment and check the dipstick. Pull it, wipe it, reinsert it fully, and check again. Add oil gradually until the level reaches the correct mark. Don’t chase perfection by dumping in the last bit blindly. Overfilling is just as sloppy as underfilling, and it can cause problems.
Start it, then inspect it
Put the oil fill cap back on before you do anything else. Start the engine and let it idle briefly so the new oil circulates through the filter and passages.
Shut it off, wait a short moment, and inspect:
- Look under the car for drips at the drain plug
- Check around the filter for seepage
- Recheck the dipstick after the oil settles
If the level is slightly low, top it off carefully. If you see a leak, don’t drive it until you know whether the problem is the plug, washer, or filter seal.
A clean paper towel under the drain plug area makes fresh leaks easy to spot.
Dispose of used oil the right way
Used motor oil and filters shouldn’t go into household trash, storm drains, or onto the ground. Pour the old oil into a sealed container and take it, along with the drained filter, to an auto parts store or recycling facility that accepts used oil.
This is also a good time to clean up other garage waste responsibly. If you’re sorting old car-related items and dead household batteries while you’re at it, this e-waste guide for battery disposal is a practical reference.
Wipe your tools down, note the mileage and date, and you’re done. That record matters more than people think, especially when you’re trying to decide whether your driving habits call for a shorter interval next time.
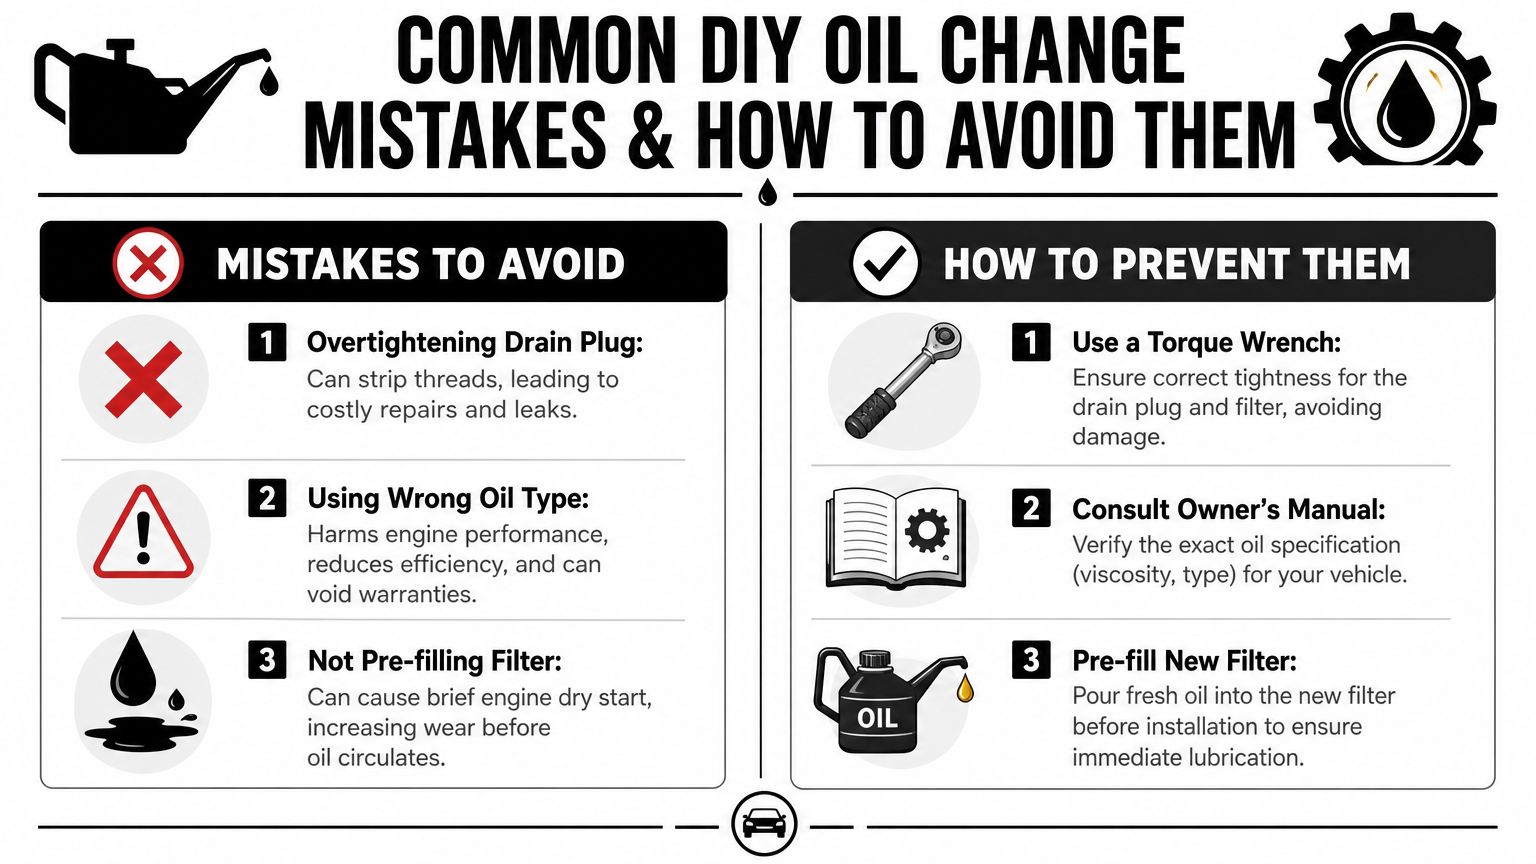
Common DIY Mistakes and How to Avoid Them
Most oil change disasters don’t come from hard steps. They come from small, preventable misses. A rushed filter install, the wrong oil off the shelf, a drain plug tightened by feel until the threads surrender. These are the lessons people usually learn the expensive way.
Mistakes that cause the most trouble
Some problems show up immediately. Others only show up after a few days of driving.
- Overtightening the drain plug. This can damage the oil pan threads and create a leak that gets worse the next time the plug comes out.
- Installing the wrong oil. Using the wrong viscosity or spec can affect how the engine starts, protects itself, and performs.
- Forgetting the fill cap or dipstick. It sounds obvious until you’re distracted mid-job and oil ends up all over the engine bay.
- Leaving the old filter gasket behind. A double-gasket filter can leak badly once pressure builds.
- Changing oil but skipping the filter. If you’re wondering about the trade-off there, this article on whether to change oil without changing filter explains why that shortcut usually isn’t worth it.
The habits that prevent those mistakes
The difference between a nervous first oil change and a clean, repeatable one usually comes down to routine.
Try this checklist before you start the engine:
- Touch the fill cap and say out loud that it’s installed.
- Touch the dipstick and confirm it’s seated.
- Look at the filter and confirm it’s new and dry around the base.
- Look at the drain plug and confirm it’s clean and dry.
- Check the oil level after the engine has run and settled.
Good DIY work is less about muscle and more about sequence. The right order prevents most mistakes.
When “feel” isn’t enough
DIYers often judge success by whether the engine sounds fine afterward. That’s understandable, but it isn’t always a full picture. Professional oil analysis looks at wear in parts per million, and a wear rate below 5 ppm per 1,000 miles is considered optimal. Persistently higher wear suggests testing a different oil brand or viscosity, according to this used oil analysis methodology explanation.
That doesn’t mean every commuter needs lab testing. It does mean the right oil and filter combination is more than guesswork, especially if a vehicle sees hard use, short trips, towing, or repeat contamination.
When to Skip DIY and Visit a Professional
Learning to change oil and filter yourself is useful even if you don’t plan to do it forever. You’ll understand what the shop should be doing, what questions to ask, and what a finished job should look like. That knowledge alone makes you a better vehicle owner.
Still, there are times when DIY stops being the smart move.
Cases where a shop makes more sense
Some vehicles fight you every step of the way. Skid plates, cramped filter access, cartridge filter housings in awkward locations, or splash shields held on by fragile clips can turn a simple service into a long afternoon.
A professional visit is often the better call when:
- You don’t have a safe workspace. Sloped driveways and soft ground are bad places to support a vehicle.
- Time matters more than the project. If you’ve got a packed week, convenience has real value.
- The car has a leak or prior damage. A stripped plug, seep at the filter housing, or damaged undertray needs more than a basic oil change.
- You want documented service. That can matter for maintenance history and peace of mind.

Why professional procedure matters
A lot of drivers think an oil change is too simple for mistakes, but the details matter. Improperly torqued drain plugs and cross-threaded filters are leading causes of oil-related warranty claims and roadside breakdowns, as discussed in this industry-related note on oil filter mounting and service errors.
That’s why a good shop isn’t just selling fresh oil. It’s selling repeatable procedure. Correct oil. Correct filter. Correct torque. A second set of eyes under the vehicle. That matters even more for busy families, commuters, and anyone who doesn’t want to wonder if the drain plug is going to hold.
The practical trade-off for Plano drivers
If you enjoy working on your own vehicle, have the tools, and can do the job carefully, DIY is still a smart skill. But if your Saturday is already spoken for, or your car is awkward to service, a fast trusted local expert is often the better value.
The best choice isn’t always the one with the dirtiest hands. Sometimes it’s the one that gets the car serviced correctly, documented clearly, and back on the road without eating up half your day.
If you’d rather skip the mess, the guessing, and the crawl under the car, Express Lube & Car Care gives Plano drivers a practical middle ground between DIY and dealership hassle. Their ASE-certified technicians handle oil and filter changes, diagnostics, and repairs in one stop, with no appointment needed, honest recommendations, and savings like $20 off oil changes, $25 off oil changes on Ladies Day every Wednesday, plus discounts for military, first responders, and healthcare workers.